
Big sky photography – a way to give your landscape photos the shock element.
But it ain’t easy shooting the sky, and you need to acknowledge the fact that the there will be obvious contrast issues. Even more importantly, you’ll encounter a big problem in finding the best time to go on a photo shoot. This is were we come in and save the day.
What to keep in mind when embarking on a big sky photography shoot?
Besides worrying about what gear you are using, you should consider thinking about when it’s the perfect time to take a landscape photo that is encompassed by the sky. We can’t just take photos of sunny, beautiful scenery all the time – where’s the fun in making everything blissfully happy? We need to get out of our comfort zone and take a walk, with our camera of choice gripped tightly in our hand, when there’s a storm about to hit, or a slight summer shower. The most beautiful photos that I have managed to take were the ones that made me worry not about my health, because I was soaking wet, but if my camera can withstand so much downpour.

We need to make the landscape more exciting by adding the sky, and that means paying attention to weather reports. Can you imagine what impact a bland landscape enveloped in a sky filled with a single cell Cumulonimbus cloud can have? I’ll tell you – jaws will drop.
The land needs to play the supporting role in your big photography shoots – don’t focus on capturing the essence of the land, focus on timing it perfectly so the sky is the main star in your picture.
This doesn’t mean that you forget about the importance of the land all-together. Even though it doesn’t get the lead part, it also has to bring something to the scenery – it may not be much, but still, it needs something. You could capture a single withered tree, a blacked-out boy that plays with a basketball, even a dog that just looks straight up, maybe wondering, like all of us, what does it all mean. You need to let your creativity run amok through yourself, and not worry about failing – you will fail countless of times, but failing at something is a step into being sort of a good at it.

Everyone has different preferences regarding lenses – and sometimes it really depends on the circumstance you are in – but try starting with a wide-angle zoom. I’m just stating the obvious now, but when you use a wide angle lens, you will capture more of the sky thus exaggerating the feel of impact, and you will create the illusion that clouds are rushing out at the viewer. You can play with perspective all you want, you just require time to find out what best suits your style.
Let’s talk about filters!
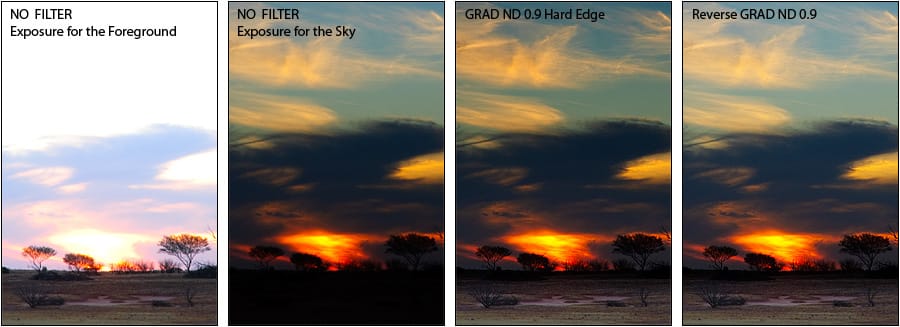
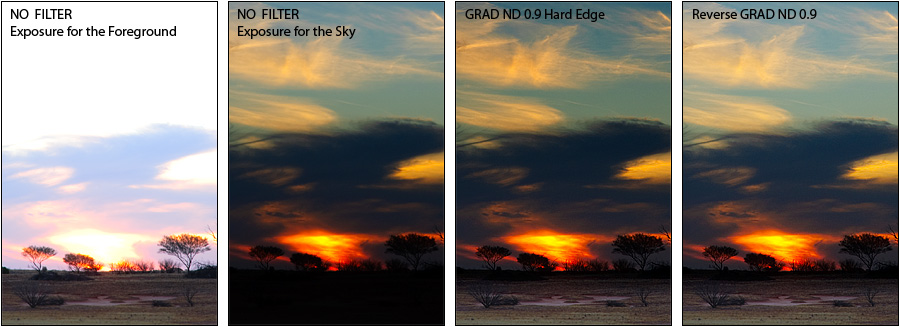
There is not such thing as a correct exposure of the land, there are only things that work in a certain circumstance, and other things that feel just wrong using. What’s important though is to significantly differentiate between the landscape and the sky. For starters reduce the exposure of the top portion of the frame, and the easiest way for beginners, and veterans alike, is to use a Neutral Density graduated filter, and align it such that it covers the sky. By doing so, you will darken the sky, while the landscape below remains bright. Play with the Neutral Density graduated filter as you like – 0.3, 0.6 and 0.9 are the most used, but let your imagination flow.
Another trick you can try is to polarise the sky – no, you’re not getting advice from a mad scientist right now, just bare with me. It’s a polariser filter that enhances the sky thus making the clouds stand out in an ocean of blue. It’s actually pretty cool once you get a hang of it. For the best outcome be certain that the sun is at a 90 degrees to the direction your camera is pointing – if the sun is straight behind you nothing will be accomplished.
Don’t be afraid to experiment with different style of frames!
You’ve done research on countless weather channels, you got your gear set up, and you just arrived at the location you are dead set to shoot, but you are missing one essential point. How big should the frame be? Should I shoot it wide, or just capture a part of the sky and a little land? From what perspective should I try shooting? Well, for starters I highly recommend using a wide angle lens so that the sky composes half of your picture, or 2 thirds of it – and balance it with a strong focal point.

Once you go out on a trial run, get home and marvel at your creation, you’ll find that you completely forgot to take a meter reading. Aren’t you glad that you are reading this? Before starting to shoot do a meter reading by tilting the camera forward. By doing so you will exclude the sky entirely. Set the reading to Manual Mode, and you’ll be able to play with the land’s exposure – balance it by using the Neutral Density graduated filter.
Final tips and tricks!
- Be careful while you use the polarise filter. At first it will look odd, and unsettling – some parts of the sky will look much darker than others, but you can solve this problem by reducing the angle’s width.
- Experiment with different Neutral Density graduated filters. The 0.6 one is set to be the most useful of the bunch, but don’t form a routine. Use the 0.9 too – they can be bought in a set.
- Lighting can be a pain in the buttocks, and you’ll most certainly try to use a ND grad filter, but you’ll learn it to be impractical when facing such problems. Shoot two, or more frames from the same point and then combine, and edit them in Photoshop for the best outcome.
With this being said, I only wish you the perfect weather, and that spark of creativity to shoot photos that you love.


