Using the Best Techniques for Shutter Speed Photography

Today’s post focuses on photography techniques that will help you use the shutter speed both effectively and creatively. We hope this article will provide you with inspiration for a new day of work.

Shutter Speed Photography Techniques

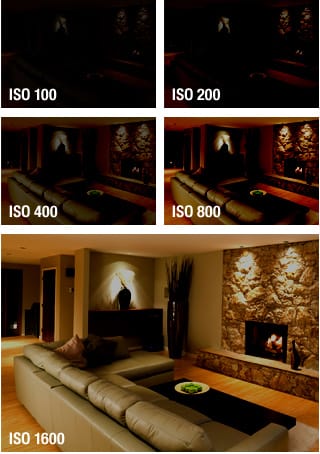
Before getting into detail and discussing more complex aspects of shutter speed photography, let’s go back to the basics and see what shutter speed is and why it is essential to know how to use it for high quality photos. Shutter speed refers to the length of time the camera’s shutter is open when capturing an image. Also called exposure time, the shutter speed is measured in fractions of a second and seconds. [Read more…]

What Does ISO Mean in Photography?

Understanding what ISO is in photography and using your digital camera accordingly is essential for capturing great grain free images. What does ISO mean and what are the ideal ISO settings for different types of photography are the questions we decided to answer to in a more in depth manner.

What Does ISO Mean?


ISO is one of the three pillars of photography along with Aperture and Shutter Speed. We have already touched both on the ISO meaning and its importance when we discussed how to make the most from your camera exposure. However, there’s always more useful information to provide on the subject, especially for beginners.

To put it simple, ISO refers to how sensitive your digital camera or film is to light. So anytime we talk about ISO photography, we refer to the ideal amount of light we need for well-exposed images. Both in film and digital photography, ISO indicates the sensitivity to light and is measured in numbers – 100, 200, 400, 800 etc. These numbers are established by the International Organisation for Standardization. Here are the ISO standards used in photography:

ISO Standards used in Photography - ISO scale

Back in the film photography days, an ISO of 100 was best for shooting in natural light, while 400 ISO was commonly used for indoor photography.

In our digital age, though, ISO settings allow you to better control the quality of your photo. As compared to film, on digital cameras you can set a different ISO for each shot. So, in case you come across situations when you cannot use flash, you can rapidly switch your ISO up to 3200 and make the image sensor more sensitive to light. With film, the higher the ISO, the more grainy and noisy the pictures were.

How does ISO work? The lower the ISO is, the less sensitive your camera will be to light. A higher ISO number is thus necessary in low light conditions. This, unfortunately, increases the noise of your shots, which means that finest images are always achieved in natural light.

experimenting with iso settings

Experimenting with ISO Settings

Base ISO

All digital cameras have a so-called base ISO which is the lowest ISO you can use to capture high quality images. While most of Nikon cameras have a base ISO of 200, the typical base ISO for Canon is 100.  ISO 100 is the lowest recommended ISO for digital cameras, but the number can drop to 80, 64 and even 50 depending on light conditions and shooting purposes.

The ISO number can be increased from 100 or 200 to 400, 800, 1600, 3200, 6400 end even higher. The highest the ISO is, the less time is needed to capture an image. For instance, ISO 100 has a capture speed of 1 second, while ISO 1600 speed is sixteen times lower.

Auto ISO

Many digital cameras have a special setting called Auto ISO. How does Auto ISO work? Auto ISO is great for low-light shooting. All you need to do is set a maximum ISO number to limit the grain in your image, such as ISO 800, and the camera will automatically change it based on the amount of light available.

auto iso settings for Canon

Auto ISO for Canon Digital Cameras

ISO, Aperture and Shutter Speed

Before experimenting with different ISO settings, it is important to learn more about Aperture and Shutter Speed which with ISO are part of the Exposure Triangle.

Light and noise are affected not only by the ISO number, but also by how fast the shutter speed and how large the aperture are set. A slower shutter speed means a longer time for the light to hit the image sensor. Also, the larger the aperture is, the more light will get through the lenses.

A low ISO goes hand in hand with a larger aperture. The less sensitive is the image sensor, the more light will need to get through the lenses. Also, when using a lower ISO, it is advisable to set slower shutter speed so that the light is delivered into the sensor over a longer period of time.

Consequently, if we set the ISO high, we need less light over a shorter period of time.

ISO Settings by Types of Photography

Next, we are going to answer to how to use ISO on your digital camera according to different types of photography.

  • LOW ISO USAGE

Low ISO numbers, such as 100 or 200, are perfect for shooting in bright light. Natural light allows you to stick to a low ISO which will result in a higher quality and less grainier or even grain free images. A low ISO is ideal for all types of outdoor photography, be in landscape, nature, flower or travel photography as long as the sunlight is your friend.

Flower at ISO 100

Flower Captured at ISO 100

Low ISO can be used in dark settings as well, if you wish to add a dramatic effect to your photographs. However, if you want to lower the ISO number and there is little light to work with, you should also use a tripod or hold your camera steady by placing it on a flat, solid surface.

  • HIGH ISO USAGE

High ISO is mandatory in low light conditions. In order for your shot to be well-exposed, don’t forget to set a faster shutter speed as well after increasing the ISO number.

Usually, higher ISO settings are needed for indoor photography when shooting:

  • Indoor Sport Events
  • Art Gallery Shows
  • Parties and Weddings
  • Interior Design Photography
low light examples of ISO settings

Low Light Examples of ISO Settings for Indoor Photography

In certain circumstances, you can use a flash instead of increasing the ISO, but the images will probably get noisier and grainier.

We hope we provided you with useful answers to ‘what does ISO mean?’ and ‘how does ISO work for stunning results?’. If you have any other questions or comments, just drop us a line.

Image Sources: 1,2,3,4

5 Tips to Prepare Your Clients for the Photo Shoot

prepare-your-clients-for-the-photo-shootPortraiture and wedding photography may seem a bit like alchemy – and that’s because of the artistic ingredients involved in the process. However, there’s also a lot of science behind taking great pictures of people in formal settings. We’ve covered a lot of the essentials of this part-art, part-science endeavor before, but today we’re going to approach the issue from a wholly different angle. You see, no matter how skilled you are as a professional wedding photographer, or how much you know about lighting and compositions, there’s one ingredient without which all your photos are going to seem less than genuine. That ingredient is collaboration and it has everything to do with how you prepare your clients for the photo shoot. Now, especially for beginners this may seem like a daunting task, since talking to people you barely now can be difficult – all the more so when there’s a lucrative connection at stake. But with our bare essentials list of tips and tricks, we’re going to try and figure out the secrets of the photographer-client collaboration, one step at a time.

#1 Know what to tell your clients

Let’s break this down: you’re a professional wedding photographer, while your clients are mere normal people. They are effectively paying you money in exchange for your expertise. That’s why it’s vital to have that expertise, your very own handbook of style, laid out very clearly in your head. In fact, it’s even more useful to write it down, in accessible, layman terms. Know how much information they’re going to need at each step of the process – you don’t want to overwhelm them. The goal here is to create very clear expectations about what it’s like to work with you and to make them want that.

#2 Know what you’re about

This essential point, which you need in order to prepare your clients for the photo shoot, is inextricably linked with the one above. In fact, it’s difficult to tell which one comes first. Regardless, the point is that your clients expect you to have a philosophy, a concept behind your work – and they will keep asking you about it, in various forms, each step of the way. Needless to say, as a professional, you need to have the answer to this question ready, even if a potential client were to wake you up in the dead of the night.

#3 Know where to shoot

Though for a photographer setting the precise location right away might not be the main priority, it always is for the client. If you want to best prepare your clients for the photo shoot, expect to be asked this question early on in the process and know that you get to have the final say. If you only work outdoors, or, conversely, in a studio, do stand your ground and explain this from the get-go. Explain how you select your wedding shoot locations and sample your arguments with illustrations from your previous work.

#4 Know how to handle fashion choices

It requires no explanation, since this is wedding photography we’re talking about, but we’re going to lay it out for you anyway. It is vital to prepare your clients for the photo shoot with tips on what to wear. Some wedding photographers actually choose their clients’ outfits, others join them in their quest for attire, while the more relaxed set simply comes with a set of handy guidelines. Decide which approach you’re more partial to and prepare to stick with it.

#5 Prepare your clients for the photo shoot per se

This final point on our list involves actually running them through a description of what’s going to happen during the actual photo session. Tell them what they’re going to do and explain what you’ll be doing to. Don’t limit yourself to descriptions – tell them about the whys, too. The more they’re comfortable with your reasons, the easier it will be for you to work with them.

4 Poses That Make Your Photographs Look Amateurish

When you first start out as a photographer, you tend to have a false sense of expertise. Your family tells you your images are fantastic. Your close friends tell you they love what you do. So you print up a few business cards and start out in the business.

Then things change. The moment you start hanging around true professional photographers, attend a few classes by people that have made it in the industry, or submit your work to a professional photography contest … that’s when you learn all the mistakes you’ve been making along the way.

The first time someone criticized our photography it hurt. Did they really think it was that bad?

Then as we began learning more about what the pros were saying, and really studied our own work, we discovered they were right.

Taking an amazing image is more than luck. Its more than letting a person roam freely in front of you, snapping a few images as they “do their thing”. It takes a lot of work. You have to get a completely natural looking image that has every single aspect of it well thought out in advance. [Read more…]

How To Add Creativity Into Your Images

About a year and a half ago, I introduced you to an up and coming photographer, Neil Creek. Back when I first met Neil online, Twitter was a relatively new site, and he was making great headway by offering his MeetHeads concept at local tweetups.

Neil has been busy as ever, and recently created an ebook that is now ready for you to learn from. His ebook, Photo Nuts and Shots: Tools and Techniques for Creative Photography is filled with over 100 pages of guidance and tutorials to help you become better and more creative with your photography.

And for a limited time, you can save 25 percent as part of the early bird special. For only $14.99, what have you got to lose?

Order Photo Nuts and Shots: Tools and Techniques for Creative Photography Today

Tips For Taking Better Holiday Portraits

This week it’s Thanksgiving here in America, which means it’s the start of the holiday season. Family and friends will be together more, meaning more opportunity for potential portrait sittings.

The larger the group, the more opportunity you have to sell. Yet if you have a small home studio, or no studio at all, where are you going to photograph everyone? While it may not be a problem if you live in a nice warm climate, what do you do when the wind is howling and the snow is falling?

Find A Perfect Location

Don’t scout the perfect location on your own; talk with the family as well. Maybe they are members of a local country club that would be more than willing to let you use their area for a portrait. If they are planning on going out to eat after the portrait, maybe you can work with a local hotel, and use their surrounding grounds. Parks also can be very attractive in both winter and summer – how about an ice skating pond in the distance? Use your imagination, and try something new. Don’t be afraid to ask – you never know where you can end up for a perfect portrait experience.
[Read more…]