5 Great Ideas for Couples Photography

We know that when you’re in love you want to scream it from the top of your lungs and let the whole world know about it. Because it’s not really socially acceptable to do it, we suggest you try some couples photography, so you and your significant other can capture your love and share it with your friends and family or simply keep it for yourselves. Today we’re going to present you with 5 great ideas for couples photography, so read on and take notes.

Get a Theme!

One of the best tips for creating the perfect couples photography shoot, is to get a theme and try to stick to it. Also, keep it simple and try not to bring too many props into the scene. Let’s say, for example that your theme is military: try not to bring too many guns into your shoot, because guns in loving and intimate scenes are extremely bad. Choose a white background, wear some khakis, look cute and start kissing! That’s pretty much all you need. If you overdo it, your picture will look terrible, take it from us, we know about these things.

In the Buff, In the Boudoir!

Couples Photography 2

If you know that the pictures won’t be leaked online or that you’re not planning to send them to both your families as Christmas cards, you could try to be a little bit more romantic and sensual and try some nude photography. Naturally, you will need to keep it classy and professional, so we suggest you don’t really show anything, but instead hint at nudity. Don’t make it too sexual, because it’s really hard to pull such a thing off and very easy to make it look cheesy and trashy. Our tip for a beautiful and sexy nude couple photography is to get yourself a good professional photographer. It may cost you a bit more, but it’s definitely worth it. All you need to do is come up with some erotic ideas and let them do all the work!

Family Comes First!

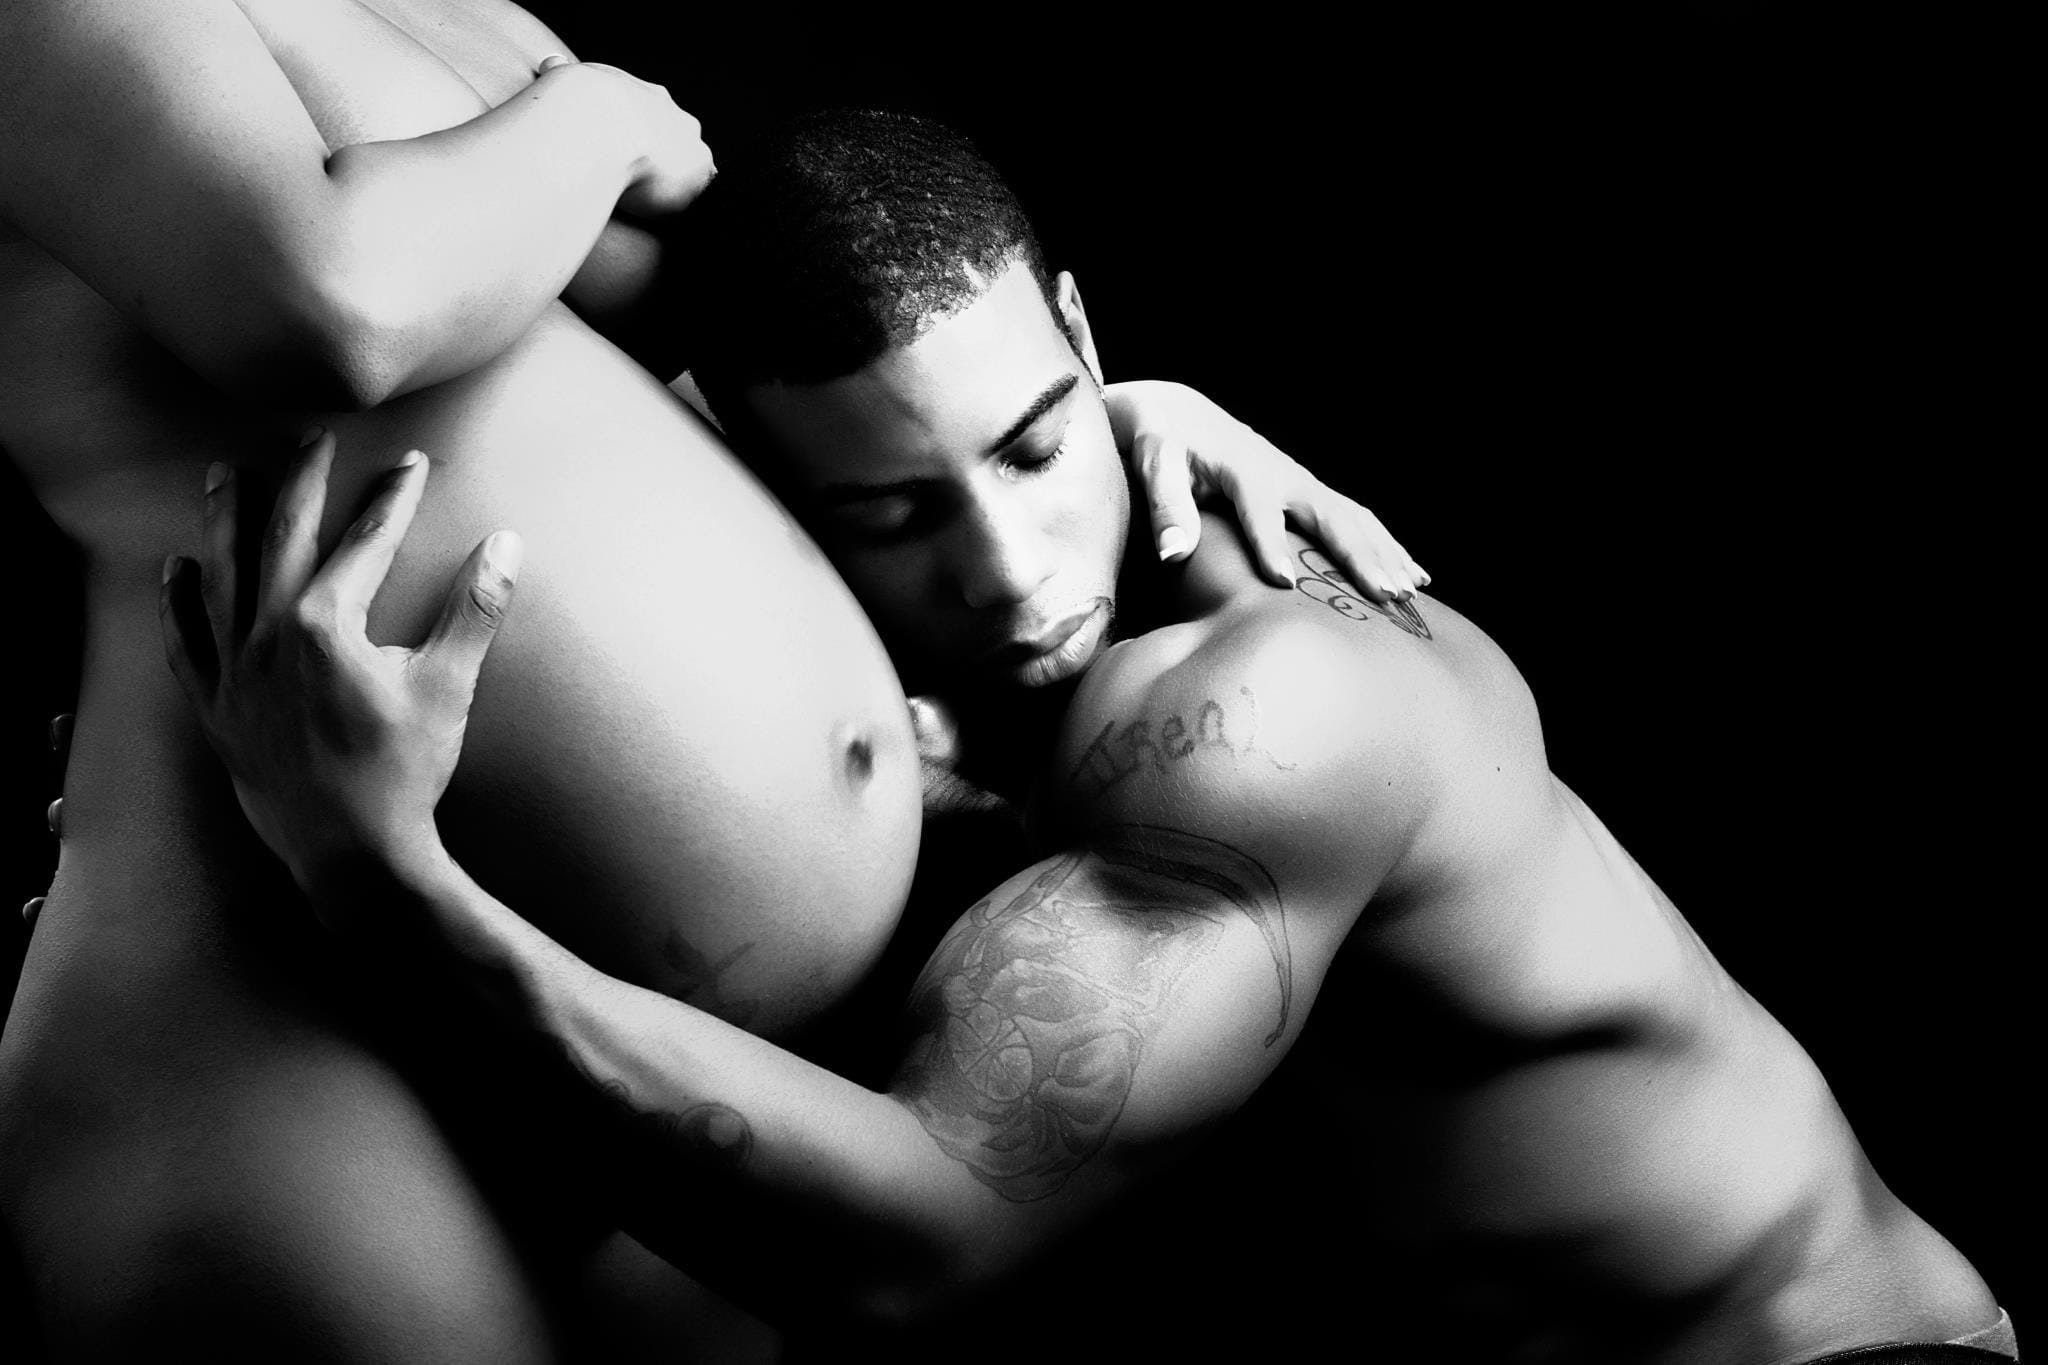
If you and your significant other are already married and/or have children or are pregnant, that makes for some great couples photography! Nothing says love better than a family photo. Cute family photography poses include your kids on your shoulders, cats and dogs around you and even some pregnant belly kissing.

Break the Boundaries!

If you’re a quirky couple that doesn’t stand for traditionalism, then you should really include that into your couple photography. What is normal anyway? Nothing more than a setting on a dryer, so get your freak on and shine! So, you’ve got a thing for snakes and tattooed men?! Girl, you’re not the only one, so grab your man and show him some love in front of the camera.

Love the Camera!

Couples Photography

So many people get uncomfortable in front of a camera. If you know that you have troubles when a camera comes out, try to relax before a shoot and study your face and expressions in the mirror. It’s the best way to get to know your facial expressions and to know how to act in front of a camera. Some people are born to be natural when they’re having their photograph taken, while others have trouble with it. You should know that posing can be learned and that choosing a good photographer will help immensely with your fear of the camera. Talk to them beforehand and tell them about your fears and worries, a good photographer will always try calm its subjects.

Have you ever tried couple photography? How about erotic couples photography? Care to share your experience with us? Drop us a line in the comment section below, we love hearing from our readers!

6 Photography Project Ideas for Students

So, you want photography project ideas? You’ve come to the right place! Last week we’ve given you some important tips on how to start a street photography project, but if street photography’s not your cup of tea, then we’re going to give you a few more ideas in todays’ article. Most of these ideas are pretty basic and are aimed at students who are just getting into photography. Read on and enjoy!

365 Days

This one is probably the most popular photography project idea out there. It’s a project where you’re supposed to take a photo of something every day for one year. It’s mostly to solidify your passion, incorporate photography into your daily routine and also create something nice and important. We suggest you start with something a little less personal, such as a tree that you like in front on your house or close by. Take a photo of it every single day for one year and we guarantee you that it will be a hit with your friends and family and maybe even Youtube.

100 Strangers

Street portrait of a stranger taken in London

We know you’re just starting out and you may be still a little shy about approaching people, but if you do try this project, we’re going to assure you that you’re going to come out of it a much wiser person. Taking a photograph of 100 strangers requires guts, determination and time. You will need to talk a bit to each one of them and get their backstory. You’ll learn a lot about photography and people, but isn’t this why you wanted a photography project idea in the first place?

Just Pick Something!

Be creative, pick one thing and go crazy! Pick one color, yellow, for example and do a project about it; photograph all things yellow and you’ll see how much you’ve got to learn about photography and location during this photography project. Once you get the hang of it, the way you see ordinary things will definitely change. You’ll look at things with brand new eyes and this will not only help your present photography project, but all your future photography projects!

Mono Could be the Way

photography project ideas black and white

No rookie photographer can do wrong with an all black and white photography project. Aside from the fact that you will learn a ton of things about color and light during this colorless photography project, you’ll also learn a lot about the importance simplicity in photography.

52 Photowalks

When you’re just starting out with photography, you tend to take a lot of photos of things that you already know so very well, such as your friends, parents, house and surroundings. If you force yourself to go on photowalks, then you’re going to discover many interesting locations that you may not have otherwise. Go on a photowalk once a week and you will see that in no time, your photography will definitely improve and you’ll find many cool spots!

A Day in the Life of

photography project ideas parents

Pick someone you really admire, like your one of your parents or a teacher of yours and document one day in their life. Talk with them beforehand and establish some basic rules and then just follow them around and focus on their bodies, the people they interact with, their hand, their faces, the object they come into contact with. Even if their life isn’t the most thrilling, movie-worthy life, you can still make a lovely project, because interesting doesn’t have to equal thrilling. Remember that!

Are you going to try any of these photography project ideas? Drop us a line in the comment section below and tell us how it goes, we would love to hear from you.

Tips on How to Start a Street Photography Project

Welcome to another article on street photography! On Friday we’ve given you a few tips on what to look for when out on the streets with your camera in hand and today it’s time we gave you a few tips on how to start your very own street photography project.

JH Engstrom is a Swedish photographer and artist who lives in Paris, France. His photographs are stunning portrayals of the human condition and its loneliness and absurdity. When he goes out in public spaces and photographs people and objects, he immerses himself in the atmosphere and you should do the same. Don’t copy other artists and photographers, but learn from them about the way they are approaching their subjects and their photography. JH famously said that he’s more interested in confusing rather than exxplaining, so find your approach very own approach to photography. Find what drives you to take photos in the first place and you’ll come up with a street photography project in no time.

street photography project JH Engström

Let’s assume that somehow you are fascinated by people with piercings. Make your street photography project about that. Learn where to go to find people with piercings, befriend some of them, talk to them and ask for more information that will help you create photographs that matter, that people would want to see.

Finding a street photography project is very important because it will help you stay focused when shooting and it will help you gain more insight into a subject. Let’s take a look at some tips on how to start a street photography project.

Focus on the work, rather on showing your work.

People get so excited these days. Whenever they take a good shot, they’re so eager to show it off and share it with friends. The great thing about a photography project is that you can’t (or should not) do that until your project is over. Some people think that a good time for a photography project would be one year. One year where you immerse yourself in a project and a subject would be enough to get you to be a connoisseur, if not an expert on that matter. It would give you enough time to get some great photographs and if you resist sharing them, the impact of you work would be so much greater.

Making projects is also much better from an artistic point of view than showcasing a single image. As powerful as it may be, one single image doesn’t have the ability to tell the stories that a project has.

Have an amazing street photography concept.

Really think about what you’re getting yourself into. You’re going to be spending one year if not more photographing people and places that deal with a single concept and subject. Make it worth your while, because if it doesn’t, then you would have wasted your precious time.

Think about what fascinates you, what scares you, rather than what you’re comfortable with. Don’t think about things that the world would be interested, but think about what you would be interested in. Be selfish and inquisitive!

Once you come up with a concept, leave it aside for a while and think about some more. When you get the right idea for a street photography project, you’ll be able to see the light bulb go off in your head.

Give cohesion to your images by staying consistent with your gear.

It may be hard to achieve, especially if you’re shooting for a long time, but do try to use the same camera, film type and lens. It will help the project look better.

Get feedback.

Feedback is really important in this line of work, so you should have someone you can rely on to give you constructive feedback. Because you won’t be publishing any photographs of your project for a long period of time, you are going to need some human input, someone who will tell you if you’re going in the right direction or not.

Edit, sequence and publish

Once you’re done shooting, comes the more laborious part of editing and sequencing your photographs. Try to keep it as simple as possible, especially if it’s your first project. When sequencing your photos, keep in mind that there should be cohesiveness and a certain degree of flow between the photographs. When all that is done, publish your project on Flickr, Facebook, your own personal Blog, or get a traditional publisher to publish your work in book.

Do you have any other thoughts on this matter that you would like to share with us? Drop us a line in the comment section below.

Street Photography – What to Look for When Out on the Streets?

Welcome back to our second article on street photography! Last Monday we promised you we would take a more in-depth look at street photography, and that time has come! Today we’re going to talk about what to look for when out on the streets to serve as inspiration.

So, you’ve got your camera with you and you’re out on the street, but you can’t aimlessly walk around holding your camera until you see something impressive and worth shooting. Or can you? Well, if you’re just starting out in the street photography field, then I’m afraid you are going to do a bit of wandering about until you start to see the street with new eyes. Because basically, that’s what you need to learn to do. You’re no longer a simple walker of the streets, you’re an observer and one needs to learn how to observe.

Put your most comfortable shoes and clothes on and walk the streets! Take a seat somewhere where there are a lot of people and start observing. People watching can really be an interesting thing and you can end up getting lost in it, which is a wonderful thing.

Almost all street photographers are talking about the decisive moment, a term coined by one of the earliest street photographers in the world, Henry Cartier-Bresson. That decisive moment is the moment when you know that what you’re seeing needs to be captured on camera. It’s when everything just comes together to create a close to perfect moment; it’s about timing! There may be many decisive moments when you’re out on the streets and that’s OK. Take out your camera and snap pictures every time you feel you’re having one of those moments. You’ll find out later if the moment gave you a good picture or not.

street photography ed peters

Ed Peters

The decisive moment usually comes from facial expressions, gestures, movement and action, so make sure you snap more pictures so that you have where to choose from.

The capture of emotion is mainly what drives the photographer to become a street photographer. Isn’t this what photography does best? Show us who we really are?

Strong emotion will give you the best photographs, but strong emotion is really hard to come by and harder to capture. Do you really have what it takes to go to a man who is crying on the street and take his picture? Can you do it? You’ll have to, if you want to be a street photographer!

Another fun and great tool for capturing street photography and creating amazing shots is juxtaposition. This refers to contrasting elements in your frame. Think about a man carrying a yellow umbrella in a crowd of people with black umbrellas. This is a perfect example of juxtaposition.

street photography Maria Serban-Temisan

Maria Serban-Temisan

Take the above photograph and see how much more powerful this image is thanks to the red background the soldier happened to walk by. It singles out the soldier, it makes him the star of the shot.

If you’re looking for using juxtaposition in your photographs, then you should start off by searching for an interesting background. Billboards and building walls make great places to start. What you could also do is juxtapose emotions. Go to a playground and capture the only crying child among the sea of laughing children. You get the idea!

Not all street photography needs to focus on emotions! You could find interesting shapes and shadows and play with them until you get something interesting and worth shooting. You need a bit of a trained eye to get the perfect angle, but practice will get you there!

street photography christophe agou

Christophe Agou

Another great tip for doing street photography is to focus on details. This will increase the mystery and will offer a clean and fresh view of objects and body parts. Sometimes we forget to look in people’s eyes or look at their hands and a photograph of those bits and pieces can really shake us up.

Also, don’t just look at the people when out on the streets! Look to the ground and see what you can find there. Again, use common objects to achieve uncommon photographs. Take them out of context, juxtapose them, do close-ups, play with them and with the camera until you get something good.

Do you have any more tips and tricks for getting out there on the streets and taking the perfect street photograph? Share them with us in the comment section below.

7 Tips for Shooting Autumn Foliage

Summer’s gone and every photographer on Earth is looking forward to the amazing colors that autumn brings along with it. Summers are always busy; you’ve got weddings, holidays, trips and all sorts of events that involve subject and lots of light and heat. We’ve recently talked about how to take precaution to prevent your subject’s exhaustion, but what about the photographer’s exhaustion? At the beginning of this autumn, it’s time you took a little break and enjoyed nature; take your camera out and go on walks and photograph the lovely autumn foliage.

Autumn isn’t just about foliage and lovely colors, though, as it can prove to be quite a difficult season for a photographer: you’ve got less light, fog, shadows that will prove challenging, even to the more seasoned photographer. That’s why we decided to provide you with a few tips of shooting autumn foliage. Read on and take notes!

Do We Even Have to Mention that Location is Everything?

trees Tips for Shooting Autumn Foliage

If you want to get awesome photographs without much effort, then you need to go to where the magic happens in the falls. Places such as New England, Minnesota, Wisconsin, the Colorado Rockies and even New Hampshire are amazing in the fall. If you can’t afford to travel, or you simply do not have the time to do it, you can ask Google some question and it will deliver.

Exposure?

Our advice is to use Matrix metering for pretty much everything, but do make sure to check the histogram to see if highlights are being clipped. Another great tip regarding exposure is to push the ISO to keep the depth of field while maintaining a high shutter speed, in case there are too many clouds in the sky. The thing is that when you’re photographing landscapes you don’t want to open the aperture, because it’s going to take away from the depth of field.

Macro Works Great in the AutumnMilkweed Tips for Shooting Autumn Foliage

Autumn close-ups don’t necessarily need to be of foliage; think about how wonderful a close-up of a milkweed seed pod will look on film. It won’t look like an explosion of color, but it will still scream fall. Use the colors of the fall as an excuse to hit the woods and find great things that need photographing.

Water and Autumn Go Together Perfectly

Water simply becomes magical in the autumn, so focus on creeks, ponds, lakes, rivers or whatever puddle of water you’ve got around you and great results are to be expected. When choosing a fall location, take water in consideration, because it transforms any good location into a great one in the autumn. Try some long exposure when photographing and you’ll get texture that will make your photographs uniquely beautiful.

Long Lenses Capture Autumn’s Beauty

If you want to focus solely on autumn foliage photography, then our tip is to use a long-focus lens. Try an 85mm long lens and see if you are happy with the results. There would be no reason why you wouldn’t be.

Take Advantage of the Autumn Fog

fog Tips for Shooting Autumn Foliage

Fog and mist can be a photographer’s worst nightmare, but in the right circumstances (in the autumn, mostly), fog can make you achieve some spectacular results. Fog will soften colors and add mood and atmosphere, but it will take you a few shots until you get the hang of it.

Start Exploring

Fall is perfect for driving around and exploring the areas that have great potential. Grab a map and start searching for spots where you think the most color will be. Obviously, the more trees an area has, the more colors you will find there. You can even leave your camera behind the first time you do your exploring, so that you can simply scour the land for great spots and enjoy yourself. If you have the time, do your exploring in the afternoon, when the sun is softer.

Did you enjoy our tips for shooting autumn foliage? Would you like to share any more tips with us and our readers? Drop us a line in the comment section below. 

Tips for Mommie Photogs: Shooting Weddings While Pregnant

shooting-weddings-while-pregnantSome women can’t wait to go on maternity leave once they find out there’s a little one on the way. Along the same lines, shooting wedding photography with a pregnant bride can be one of the most endearing, delicate, and special experiences you’ll have as an artist. However, today’s post is about neither one of those scenarios, but about what you can do if you’re shooting weddings while pregnant. Since wedding photographers are largely freelance, many female professionals choose not to abandon their business, or put in on hold, while pregnant. If you’re about to face this situation, you might wonder how you’re going to be able to manage it all – the baby that’s on the way, the business, and the actual, physical challenges of working when you’re a few months away from giving birth. We’ve scoured the web left and right and checked out some true stories from photographers who have gone through this. We’ve come up with a list of resources and tips you might find useful.

The checklist for shooting weddings while pregnant

  • Flip flops

If you’re the kind of photographer who cares a great deal about looking professional at all times when working, this might be a bit of a challenge for you, but it’s probably unavoidable. Chances are your feet are going to start swelling as your pregnancy progresses and if you want to keep working, you’re going to have to find yourself one (or several) nice pairs of flip flops to change into, in order to keep your feet from killing you. Shooting weddings while pregnant does involve a lot of standing, you know?

  • Back support

The same pretty much goes for back aches. They’re very difficult to handle for some women, even if they’re not up on their feet and running about, taking pictures all day. Those women who want to keep shooting weddings while pregnant might want to invest in Maternity Support or a similar form of support for their back.

  • A breast pump

There’s no way around it: if you want to keep working during and immediately after the pregnancy, you’re going to need a carry-on with a special portable breast pump.  Alternatively, you can opt to breastfeed at weddings, if you’re comfortable with this. Most wedding guests are tolerant about it, according to several real life mommy wedding photographers. However, if you can’t afford the downtime, or just want to pump for whatever reason, then an “on the go” breast pump is your best bet.

  • Water & protein

Much like you are going to have to feed the baby on the go, you’re going to need to nourish yourself, too. If you’re a newbie wedding photographer, don’t think there’s going to be any time for you to snack at the wedding party – there usually isn’t. And keeping hydrated and well-nourished while pregnant is essential, both for your health and stamina, as well as for the baby’s well-being. As such, make it a point to never leave home without plenty of water and protein bars, to keep you up on your feet all day long.

  • An assistant

Yes, it’s an added cost, but one which might just save your wedding photography business while you’re carrying. The assistant will help carry your gear and other bags – and they also come in mighty handy when it comes to remembering that you actually have to eat those protein bars if you want them to have any effect.

  • A backup

We’re talking an alternate wedding photographer that you can call on, if need be. Someone you trust is able to step in at the last minute, in case anything goes wrong with you and you need to step down from an engagement. Always have the phone number of such a trusty friend on hand, you never know when you might need to use it.

The Travel Photography Location Shoot Checklist

travel-photography-location-shootIf you’re an aspiring travel photographer, there are probably some inherent mistakes that you’re going to fall victim to. Don’t worry about it – take everything thrown your way as a learning experience and a spring board to better skills and more amassed know-how. That being said, though, there are certain mistakes which you can avoid: that’s why today’s post brings you the travel photography location shoot checklist. Make sure you skim, scan or actually take the time to read through it, then start packing. Each voyage to a new location to photograph is an experience worth enjoying through and through.

Read up

No one expects you to know everything about your chosen destination, since most things related to local customs, for instance, you will learn about on site. However, there are plenty of great guidebooks out there, that will paint an informative picture for you in broad strokes, which will prepare you for your travel photography location shoot. Some of the best ones include Lonely Planet, as well as the Rough Guides Series. It’s also a good idea to check out tips for lesser known locations, for instance, on online forums.

Pack light

It’s easy to get carried away when packing for your first travel photography location shoot – and it also happens to more experienced artists. However, try to tone it down, especially since weight restrictions on most lines are getting stricter these days. Here are the essentials, which you are absolutely going to need, no matter where you’re headed to:

–          Battery chargers for your camera and phone (and a travel adaptor, depending on where you’re headed to);

–          A laptop, both for storing and editing your photos on location, but also for keeping in touch with your family and contacts;

–          A removable HDD for secondary backups. Remember, you’ll be on the road quite a lot for your travel photography location shoot, so you don’t want to risk losing your work to theft or destruction;

–          A sunrise/sunset calculator, which will keep you up to speed on light changes, in accordance with local sunset and sunrise times.

Explore the magic hour

Traditionally, the magic hour for photographers, also referred to as ‘the golden hour’ is that time of the day late in the afternoon, when the sky is dappled in the most amazing colors, just before the sun sets below the line of the horizon. This time of the day is likely to help you produce some amazing shots in all natural lighting. However, there’s also another magic hour, which happens very early in the morning. The light is almost just as great, and there’s another perk to working before everyone else is awake. You don’t have to deal with the morning rush of tourists.

Check your travel photography location shoot kit

Check it twice, thrice, four times if you need to, before leaving for your travel photography location shoot. There are few experiences more frustrating for a photographer than arriving at an amazing location, only to discover they’ve left their most adequate lens at home. Here’s a rough guide for what to pack and take along:

–          A DSLR body;

–          A good, lightweight tripod;

–          A wide angle zoom (10-24mm, or 16-35mm);

–          A mid-range zoom (24-70mm, for instance);

–          A telephoto zoom (70-200mm);

–          A cable release;

–          A polarizing filter – as well as some ND grad filters, if you havethem or use them;

–          Optionally, take along a 1.4x tele-extender and a macro-lens – you never know when the mood might strike you for some good macro shots on location.

Your gear should always travel along with you, as cabin luggage. If it’s too heavy, stuff some lenses inside your pockets, but never-ever leave it elsewhere, as you may risk having it damaged or stolen.

Do You Really Want The Help or Are You Just Making Excuses?

I had to laugh in an ironic sort of way.

Why is it that the people that need the most help often are the same ones with the most closed minds?

Let me paint you a story.

A photographer runs a business, yet can’t seem to understand why she’s struggling to survive. It’s not her fault after all. It’s the economy. It’s the industry. It’s everybody else. And occasionally she needs to confirm it in her mind that it isn’t her – it’s everything else. The odds are stacked against her and she’ll just have to wait it out until things return to “normal”.

So every once in awhile she does a little investigating to prove she isn’t at fault. She orders my Pricing Your Photography and skims it. Not reads and applies it. Skims it. Nothing new, AND SHE”S REALLY SHORT ON MONEY, so she returns it for her money back.

That’s perfectly fine with me. You see I’ve had hundreds of people buy my Pricing Your Photography, with only a handful returned (from people just like her). And the comments have always been overwhelmingly positive –

“I can’t believe how low I was pricing before. I’ve almost doubled my rates, and now I know why.”

“Now I know my business will be successful.”

“I’ve never looked at my prices like this before. You made something I used to guess at into a science.”

Yet I’m always intrigued when I hear the “nothing new after skimming it” that comes with a return. So I did a little investigating to determine how this photographer really is priced. And what I found didn’t surprise me – its definitely what I expected. [Read more…]

Why My Tips Will Never Work For Your Photography Business

Every single day you have access to millions of articles, publications, secrets to success manuals, videos, courses and guides.

You can read solid advice from the moment you get up in the morning until the moment you go to bed.

You can talk with a mentor, study with an adviser, and listen to your favorite guru every moment of the day.

Yet when you take all of this and try and put it into your own business life, one thing holds true: it may or may not work for you.

What?

That probably sounds like the most wishy-washy statement you’ve ever heard. How can you take advice from a zillion different sources, put it all into good use for your business, and not know if it will work for you? It should – its great advice right? [Read more…]

Blogging Is Booming For Business … If You Do It The Right Way

Its easy to get caught up in the promise of big returns by using the latest social site – whatever that may be. Yet by jumping on the “latest and greatest” social networking site, you may be missing out on an opportunity that has been there all along.

Blogs are sometimes overlooked as the strong marketing tool they are. A recent study showed that blogs as sources of online buzz have increased over the last five years  from 36 million to 181 million. Yet why are blogs still so strong? Should you be using them? And is there a right way … and a wrong way … to use a blog for your photography business?

Blogs Are The Backbone Of Success

Sarah is a photographer. When she decided to start her photography business, she had been unemployed for several months and didn’t have a lot of funds to invest in her new business. So she did what any savvy business owner would do and did everything she could for free. She printed off business cards on her home printer. And she started designing a Facebook page to showcase her work. She spent several months adding posts and content to Facebook and gradually built up a pretty good following. She gained over 2,000 followers and had a steady line of prospects and customers – enough to keep a steady income coming in every month.

Then someone got a hold of her Facebook password and started posting spam from her account. Facebook received a number of complaints and shut her account down. [Read more…]