About Geta Movila

With a background in Theater and Literary Studies, Geta is a photography enthusiast taking great pleasure in writing on photographic art related subjects. She is an active contributor for Virtual Photography Studio, always looking for inspirational ideas and creative tips on how to develop skills and gain valuable experience in the field.

Perfect Christmas Family Photo Ideas

We all love the holiday season. This is such a great opportunity to capture everyone’s joy and our kids’ sparkling smiles on camera. Whether there is or not a perfect Christmas family photo “recipe”, make sure you don’t miss out the following ideas for amazing holiday family portraits.

happy family photo

Joyful Christmas Family Photo

Christmas Family Photo Ideas

Capturing the perfect family photo involves a mix of factors we cannot always control. Whether it is the weather or your kids’ mood, unexpected thinks may come up. Do not let them destroy your enthusiasm. Get ready for anything and be creative

A perfect photo starts with smart planning.

#1. Choose a location and a time for your shots.

  • Take both indoor and outdoor photographs. Regardless of the location you choose, make sure the place is not crowdy or cluttered.
  • The time of the photo shooting is important. Schedule it during the Golden Hour (early in the morning or during sunset) to add extra magic to your shots.
  • Check the weather forecast as to avoid rainy or heavy snowy days. Natural, consistent light is essential. If it gets cloudy, though, don’t worry. A darker sky can add a dramatic effect to your shots. Get creative and enjoy shooting no matter what.

#2. Decide who the photographer will be.

  • Wil you hire a photographer or ask a friend to help you? A pro knows exactly what to do and will help you speed up the process.
  • You can use a tripod and the self-timer option on your camera.
  • You can also take amazing shots using your smartphone. We’ve got a few smartphone photography tips for you. Use a tripod (we bet you want more than a Christmas selfie) and some of the editing apps we recommend to improve exposure and add effects.

#3. Get ready for the photo shoot.

  • Choose holiday clothing and Christmasy props. Maybe you have selected a color theme for your Christmas party or you have bought an outfit you want to wear. Our tip is to keep it as simple as possible for your indoor photos. Choose neutral colors and avoid patterns that catch the eye, especially if you want to pose in front of the Christmas tree or at the Christmas table.
  • Either you wear cute, fluffy winter clothing or you capture steaming tea or cocoa cups around you, keep everyone warm and with a smile on their face.
  • Make a list of favorite poses. We have got a few ideas for you below.
  • If you plan an outdoor photo shooting, don’t forget to pack some snacks and drinks to keep you energized.

Dreaming of a White Christmas

One of the family Christmas photo ideas not to miss is, of course, the classic outdoor shot in the snow. Here are a few tips to remember for an unforgettable “winter wonderland” image:

  • Go out and shoot during the snowfall.
  • Since you’ve got a white landscape, you can choose bright but strong colors to contrast the background.
  • Dress in blue, red, yellow or green for a more powerful effect or add color with cute knitted accessories.
  • Take your family pets with you. They can make things more complicated but also add more fun to the scene.
winter family photo in the park

Winter Holiday Family Photo

The Perfect Holiday Family Portrait

Now you’ve got the opportunity to capture the whole family celebrating this wonderful time of the year. Whether it is during the Christmas preparations or during the opening gifts morning, get a picture that includes all the members of your family.

Pro tip: try to focus on everyone’s eyes. There’s where the spark of joy is.

We have seen a lot of family photos gone wrong. The secret is not to overthink the whole process, to enjoy the moment and act naturally.

Your go-to poses: 

  • holding hands;
  • group hug – these can be welcoming hugs as well;
  • smiling at each other during the big feast.

Candid Holiday Photography Fun

No Christmas photo album is complete without candid, funny photographs. In addition to classic poses and professional portraits, those unplanned shots will make you smile.

Candid arrangements may sound counter-intuitive, but when you have little kids, you want to keep them engaged and “ready” for funny family photos. Toddler pictures are the most challenging, but the results can be fantastic.

Pro tip: take as many shots as you can and try to capture the family fun from different angles.

winter fun family photo

Fun Family Time in the Snow

Candid photography tips: you can add a dynamic effect to your family photos by considering the following actions and key moments:

  • Take a photo of the kids while opening their presents.
  • Shoot the holiday preparations in the kitchen. Baking may be messy, but it makes for spontaneous pictures.
  • Hold hands while walking towards the camera.
  • Children whispering in their parent’s ear.
  • Make jokes and provoke laughter.
  • Take photos while playing outside, making angels in the snow.

The Iconic Christmas Family Photo

Want to take a guess here? Of course, we shall refer to the family portrait in front of the beautifully lit and decorated Christmas tree. This is your best chance to capture that magical atmosphere.

  • Take the photo is soft, evening lighting and with the Christmas lights on.
  • Adjust your camera for low light conditions. Set a wide aperture so that the background remains out of focus.
  • If you have a DSLR and additional equipment, use a macro lens to achieve a nice bokeh effect.

Just the Little Ones

The holiday season is not just a time for feasting. It is the time for enjoying the company of your loved ones. The little ones, of course, are the protagonists of your Christmas celebration story. Don’t miss out the opportunity to capture those heartfelt moments when they play in the snow or keep warm by the fire.

portrait of happy siblings on Christmas evening

Portrait of Happy Siblings on Christmas evening

Pro tip: Take a photo with your kids (or the little ones in your family) every year during Christmas. After the kids are grown you can create a personalized Christmas photo album for them as a gift. This can also be the perfect gift for their grandparents.

Take photos of the kids:

  • decorating the Christmas tree.
  • baking Christmas cookies.
  • playing with their sleds in the snow.
  • opening gifts in the Christmas morning.

Finally, why not turn your favorite Christmas family photo into a unique card and send it to your close ones? Or have all these pictures printed out and have them framed? For more tips and ideas on how to capture the holiday magic, take a look at our complete Christmas photography guide. Enjoy!

Do you have further ideas and suggestions to share with us? Feel free to leave a message in the comment section below. Thank you & happy holidays!

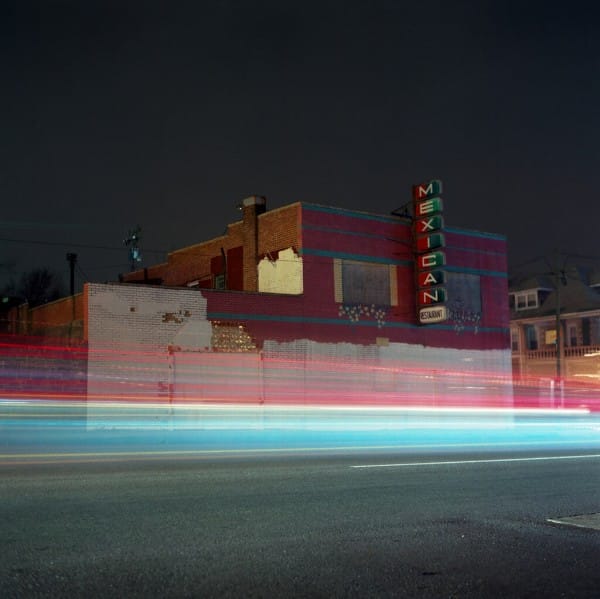
Interview with Street Photographer Patrick Joust

Patrick Joust is a Baltimore-based self-taught street photographer. His work documents the people and places of Baltimore but at the same time it creates what the photographer describes as a magical realist world of his own.

I feel like I struggle a bit internally with the desire to document and the desire to create, through a sequence of images, my own world that’s dominated by my imagination.

What makes Patrick Joust’s photography unique is his passion for shooting with old mechanical film cameras. The camera, however, be it mechanical or digital, is a medium of exploring the world around him.

portrait of Patrick Joust street photographer

Patrick Joust, 2015 © Christopher Hall

I do feel that film is almost like treasure. A lot of people who use it feel that way. It’s a luxury in more ways than one.

I am grateful for the opportunity to have interviewed another talented artist. Patrick’s work, both documentary and subjective, has won be over. Needless to say, Patrick Joust is one of the inspirational street photographers out there you should follow today.

G.M. Could you please tell us about your first encounter with photography? What made you start as a photographer?

P.J. Moving to Baltimore is what inspired me to take up a camera. I came here as a volunteer (AmeriCorps) for a small nonprofit. It involved going to many different parts of the city. I found myself wanting to take pictures of much of what I saw. It took many years for me to really figure out how I wanted to express myself with a camera, but it all started in Baltimore.

photo by Patrick Joust

Still © Patrick Joust Photography

G.M. Most of your street photographs are captured with film cameras. Is there a story behind shooting on film? What is it that makes it better for you?

Well, I started with film, so that’s part of it. I was born in 1978. Digital didn’t enter into the mainstream until I was well into adulthood. When I bought my first digital SLR, in 2005, I did go through a time when I thought I might not shoot film again. It seemed logical to conclude that this was the next step in the technology and that film was obsolete. The fact that you could shoot digital and not have the expense of buying and processing film was pretty attractive too. Frankly, at that time, I thought of film as just a medium to record images on. Even though I had been shooting for a couple years, my appreciation of photography was limited.

photo by Patrick Joust

Still © Patrick Joust Photography

It wasn’t until I started shooting medium format film in 2008 that I began to get a broader sense of the variety and depth film offered. I just loved the results I was getting. Shooting medium format actually made me appreciate 35mm, instant film, and other formats. I appreciated both what I had been missing but also what had been right under my nose all along. One of my favorite photographers, Toshihiro Oshima, said

“I don’t think film will be completely dead but it could possibly become one of the most luxurious things in the years to come.”

I do feel that film is almost like treasure. A lot of people who use it feel that way. It’s a luxury in more ways than one.

All that being said, I’m not an either/or kind of person. I can’t give up film, but I enjoy shooting digital. The economics and convenience of digital are hard to ignore. I’m passionate about film photography, but I think it’s wrong-headed and unnecessary to put down digital. You don’t have to spend all that much to take decent digital pictures. I’d say the economics of digital have helped my film photography since I’ve been able to expose thousands of digital frames without the frustration of spending a lot on film. That was especially useful in leaner years when I was an AmeriCorps volunteer or a student working part time.

This is art, after all, it’s not about the latest technology. The materials we use should be about how we want to express our personal vision, that’s all.

There are a lot of different factors that contribute to my continued interest in film. It’s not nostalgia or about slowing down the process. It’s just the aesthetics. I love the way it looks. I’ve long felt that digital is just another format for photography. It’s great and powerful, but it doesn’t replace film.

photo by Patrick Joust

Dundalk © Patrick Joust Photography

I just watched the documentary Time Zero: The Last Year of Polaroid Film. One of the most basic points being made by the advocates of instant photography is that its qualities can’t be replicated digitally, which is true.

It’s amazing how obviously fake digital polaroids are.

I’m sure it’s possible for someone to be so good at editing their digital photos that they can trick someone into thinking it’s the real deal, but it doesn’t seem easy and of course, there’s no replicating the physical product you get from shooting instant film. That’s not to disparage digital; they’re just different. Both have value.

This is art, after all, it’s not about the latest technology. The materials we use should be about how we want to express our personal vision; that’s all.

G.M. What photographic project is held dearest to your heart and why?

I’m not really all that project oriented though I do enjoy organizing my work into sets and collections and thinking about the different connections between my images. I guess the closest thing I have to a project is my ongoing chronicle of the people and places of Baltimore. The longer I’ve lived here, the more connected I feel to the city and the more opportunities I see.

photo by Patrick Joust (Baltimore Folk)

© Patrick Joust Photography

I’ve been thinking about this for a while, but since the Baltimore Uprising, I’ve been trying to figure out how to create a book on much of my Baltimore work. It’s hard to narrow things down, but probably my 6×6 portraits. Time is the challenge, but I’d love to have something together by next year. We’ll see.

Ideally maybe I can do a little bit of both. Create a sort of magical realist world of my own while also a more straightforward (though still subjective) view of Baltimore that encourages empathy and inspires.

I feel like I struggle a bit internally with the desire to document and the desire to create, through a sequence of images, my own world that’s dominated by my imagination. Of course, every photographer comes with a subjective point of view but I’ve been thinking a lot lately about the photographs that I don’t take. Photographs that would probably be good, but that don’t fit into my own ambiguous vision for what I want to do through photography.

photo by Patrick Joust Baltimore-based photographer

“surreal density” © Patrick Joust Photography

I recently watched a short documentary on Daido Moriyama in which he said:

“I am creating my own home by connecting pieces of images from my imagination and things I saw as a child. That’s how I feel about my work.”

I think that gets at what I’m trying to do, and maybe what a lot of my favorite photographers are doing as well. I like to connect places I’m from and places I visit to where I live now and somehow create a new world from those elements that work together.

Still, I get tugged back into more straightforward documentary work, especially because of the recent events in Baltimore. I feel a strong desire to give something with my photography though I’m not sure that’s possible or is something that’s wanted/needed. So there’s a little struggle there, which I’m not articulating too well, but that I think about often. Ideally maybe I can do a little bit of both. Create a sort of magical realist world of my own while also a more straightforward (though still subjective) view of Baltimore that encourages empathy and inspires.

photo by Patrick Joust on film camera

Still © Patrick Joust Photography

G.M. How important is post-processing in your work? Is there an editing software you prefer using?

P.J. It’s important. I’ve used Adobe Lightroom for years. I basically have a hybrid film/digital process. I’ve made a few darkroom prints, but my approach is to have my film developed and then scan the negatives/positives. I then run everything through Lightroom where I take care of issues like dust, exposure correction, straightening, etc.

There are limits to what you can do in digital post-processing, but there’s still a lot of latitude there and I’ll do whatever it takes to try and make a picture work. One of the pleasures of shooting film is that the emulsion you choose limits your options but also creates less work in post-processing. So post-processing is important, but I’m glad I don’t have to spend a great deal of time on it, the way I might have to if I only shot digital.

photograph by Patrick Joust street photographer

“surreal density” © Patrick Joust Photography

G.M. What camera gear do you currently use? Do you take with you any additional equipment on a shooting day?

I use a variety of different cameras, but ones that get the most use include my Mamiya C330, Fujica GW690, Olympus XA, Konica Hexar, Ricohflex, Rollop, and Canon 6D. I use a tripod and cable release for my long exposures, but that’s about it in terms of extra equipment.

street view of Baltimore photographed by Patrick Joust

“surreal density” © Patrick Joust Photography

G.M. Where do you find inspiration? Could you name a few photographers that you consider influential for your style?

P.J. All over the place. Robert Frank is one. I don’t think I have a lot of pictures that look like his, but he was an early influence, largely because of the social aspects of his work. Wendy Ewald, Greg Girard, Milton Rogovin, Saul Leiter, Vivian Maier, Justine Kurland, Gordon Parks.

photo by Patrick Joust street photographer

“surreal density” © Patrick Joust Photography

G.M. How would you define your photography in three words?

P.J. skipping this one

G.M. If you could start again as a photographer is there anything you would do differently? Are there any sectors you’d like to explore more?

P.J. I don’t like to dwell too much on things I’d do differently. I got into photography pretty late, only in my mid-20’s and even then it took me years to get “good” at it. I sometimes wish I’d gotten into it sooner when I was a teenager, especially since I took several trips to Europe and around the country and it would have been great to capture some of that. But I had a completely different mindset at the time, so it’s not so much that I didn’t have a camera in my hands but that I didn’t think of myself as a creative person.

photo by Patrick Joust street photographer based in Baltimore

Still © Patrick Joust Photography

I looked at a lot of art, though. I was obsessed with going to the great art museums of the U.S. and Europe. I was such a nerd that I skipped school to go to the Vermeer exhibit when it was in Washington, D.C. I also read a lot and watched a lot of movies. Maybe all of that was a kind of preparation for now, even if it didn’t directly involve taking my own photographs or making other types of art.

G.M. If it weren’t for photography, what else would you do?

P.J. Maybe paint or write or something. I would hope I’d find something creative to do. I wrote bad poetry for a while. Photography has been an especially good fit for me. I enjoy writing, but it also tires me out. I could never maintain a proper blog dedicated mostly to writing. Maybe I’d really get into video games. I dunno.

G.M. Any words of wisdom for photography enthusiasts at the beginning of their journey?

P.J. Have fun.

Baltimore folk - photo by Patrick Joust

Baltimore Folk © Patrick Joust Photography

G.M. Can you tell us a bit about your future projects?

P.J. Well I recently returned from a trip to northern California. I’m scanning the pictures as I type. I’m from California originally and visited some places I haven’t seen since I was a kid. I also went to Yosemite for the first time, and it was beautiful. There are so many places I want to go and so many places I want to revisit. I’d also like to photograph more in Pennsylvania, where I went to high school and college. As long as I’m healthy and able, you can definitely expect more from me.

Thank you, Patrick, for an inspiring interview and fascinating insight into the art of street photography. 

Discover more of Patricks’s photographic stories on his official website, Facebook page, Tumblr, Flickr.

Disclaimer: All images featured in this post belong to Patrick Joust and are protected by copyright. Exception makes Patrick’s portrait taken by Christopher Hall.

I hope you enjoyed reading the interview. For any questions or suggestions, feel free to drop a line in the comment section below. Cheers! :)

Christmas Photography: The Ultimate Guide to Capturing the Holiday Magic

We know there’s still a few weeks until the winter holidays, but it seems to us that it’s beginning to look a lot like Christmas! To get you inspired and well-prepared for your holiday photo session, we have come up with a series of Christmas photography tips, tricks, and ideas.

Christmas photography guide featured image

Just to give you a quick overview of our holiday photography guide, here are a few of the things we hope you will enjoy trying out:

  • photographing Christmas lights and magnificently decorated houses;
  • capturing the holiday mood in group portraits;
  • telling the story of your family holiday celebration in candid photos and time-lapse series;
  • spread the holiday cheer with some Christmasy photographic gift ideas.

Part I: Christmas Set-up – Photographing the Preparation Stages

Christmas is all about enjoying time with your family and friends. That is why we encourage you to start capturing the festive mood from its early stages. Tree decorating, gift wrapping and holiday cookie baking give a sense of the celebration scene and you shouldn’t miss shooting any precious moments spent with your dear ones.

Chapter 1: Enjoy Family Time

Start documenting your holiday with a few shots of the preparations going on around the house. This should be the starting point of your Christmas story in images.

Pro tip: prepare your camera too. Make sure you empty your memory cards and have the batteries fully charged.

Take wide shots to present the scene, medium shots to get a closer sense of the action, and close-ups to emphasize meaningful details.

In part II of our Christmas photography guide, we will focus on introducing the characters to the story too. Stay tuned :).

christmas photography - happy family portrait

Christmas Photography: Joyful Family Portrait

Recommended Settings & Techniques: The Use of Composition, Balance, and Frames

We don’t want to get all technical, but in order to transcend technology and get creative about photography, you first need “to rule the rules” (rules of composition, settings, techniques).

In other words, you should know your camera and use it to its full potential. Without further ado, here is what you should keep in mind when it comes to taking technically perfect photographs:

  • Find the perfect balance – the difference between an ordinary photo and an extraordinary one lies in achieving a balanced composition. The rule of thirds come into play here. When taking a shot try to split the image into three (imaginarily) and to place your subject along one of the lines. This trick will create a harmonious balance.
  • Use natural frames to draw your viewer into the festive atmosphere. These can be anything from tree branches to beautifully decorated window or door frames.
  • Layer your shots. Pay attention to both the foreground and the background elements in your shots. For instance, you can play with the mood and atmosphere in your photographs by achieving a diffuse background. All you need to do is set a wide aperture (between f/1.4 and f/2.8) and get closer to your subject in focus.
  • Avoid cluttering. The ultimate tip we have for you here is to avoid cluttering your images. We all have a tendency to exaggerate during the holidays, be it with food, presents or decorations. Don’t stuff your images too much, though. Let your subjects breath.
  • Combine wide, medium, and close-up shots to give a more dynamic sense to your photographic story.
Christmas Baking wide, medium and close-up shot

Christmas Baking Time

Recommended Photo Equipment: Use More than One Camera. 

  • Use your DSLR for portraits and more sophisticated shots such as close-ups and Christmas tree pics.
  • You can use your smartphone camera for fun, spontaneous shots around the table.
  • Also, don’t hesitate to take a more portable, compact camera with you for outdoor shooting. Be it a mirrorless or a point and shoot photo device, it will come in handy if you go ice skating with your friends and wish to immortalize the moment.
  • Share the joy of photographing with the little ones in your family with a Polaroid-style, mini instant film camera. If you don’t have one, put it on your wishlist. Santa might see it.

Chapter 2: Capture the Magical Atmosphere

Next, consider exploring the outdoors more. The holidays give you the opportunity to hone your street and architectural photography skills. Everything is beautifully lit and decorated, but there are more challenges than you can imagine.

Tree lights, candles, fireplaces, or bonfires – winter holiday lights can make for memorable photos. This diversity of light sources, though, may be overwhelming as capturing it perfectly in your shots is one of the hardest things to achieve in photography.

bokeh christmas lights

The Bokeh Effect

One of the most popular shooting techniques when it comes to photographing Christmas lights is Bokeh. Bokeh is that blurry effect you achieve in the out-of-focus areas of your shots by using a wide aperture lens. Your Christmas lights will appear like little, colorful and diffused balls of light.

Commonly, the Bokeh lights are placed in the background. For a more powerful effect, though, we encourage you to put them in the foreground even if they will cover your subject a bit.

Christmas is also that time of the year when people magnificently decorate their houses. Go out there and capture your town’s holiday mood. What a wonderful time of the year to explore the streets and use your photo equipment to the fullest!

Recommended Settings & Techniques when Shooting in Low Light 

You’ve got the perfect lights, but how do you find the perfect light for your shots?

  • Setting the ISO and Aperture right: during the day you should profit from the natural light coming from your windows. We all know, though, that the Christmas magic begins at dawn. What you should do is turn off the flash and increase your ISO as much as you can without altering the image accuracy (ISO 800 would work well if you use a DSLR). At the same time, you should lower the aperture (somewhere to f/2.2) and shutter speed.
  • Setting your camera on Night mode: most digital cameras have this function. The use of long shutter speed allows you to capture scene details in low light conditions by freezing the subject. The only inconvenience is that this mode automatically fires the flash to illuminate the foreground. You might get some interesting effects, but it may also affect the quality of your shots dramatically.
  • Using the flash – when and how: when shooting Christmas lights or portraits near the Christmas tree it is best to turn off the flash. However, if you still need to use it, there is a way to improve the quality of that light. A diffuser or white paper taped over it will soften the light and enhance the look of your subjects.
  • Add an artistic touch to your outdoor night photography with slow shutter speed techniques. The key to achieving an abstract look for a stunning Christmas street lights pic is slowing down the shutter speed to about 1/2 s. Use a tripod to hold your camera still and that’s it. For a more dramatic effect wait for a card to pass by.
Christmas Lights and Decorations

Photographing Christmas Lights

Recommended Photo Equipment: Macro Lenses, Wide Angle Lenses & Tripod.

  • A good bokeh effect can be achieved by using a macro lens. This will make your subject stand out sharply against the diffused background.
  • Also, when shooting in low light, a tripod is an absolute must. The benefits of using such a tool range from stabilizing your image to taking amazing panoramic and night shots.
  • For broader scene views, we recommend using a wide angle lens as well.

Recommended Read:

Part II: Documenting the Big Celebration Day

This section continues with a few more storytelling tips & ideas for your Christmas photography focusing on the celebration day.

Christmas Tree Decoration

Indoor Family Photo While Decorating the Christmas Tree

Chapter 1: Take Memorable Family Portraits

Since Christmas is a holiday you best enjoy with your loved ones, you should also tick off a few group portraits from your checklist. Besides the traditional poses around the Christmas tree or around the table, try to give a fresh look to your shots.

Consider the location beforehand. Taking both indoor and outdoor group photos will require different settings and adjustments.

A few more tips: get as close as possible so you can focus on the eyes of everyone in the picture. What you want is to express the relationship between them. One of the well-known tricks is to ask everyone to hug or lean their heads in close.

outdoor family portrait

Outdoor Holiday Family Portrait

Recommended Settings & Techniques when Taking Group Portraits

  • Take multiple shots so to make sure that if someone blinked you’ve got them covered.
  • Shoot from above to avoid capturing double chins (asking people to raise their chin might transform into unnatural posing).
  • If you don’t use a wide angle lens, you can play with the aperture settings. Set the aperture around f/8 (medium) for a greater depth of field. Always make sure your ISO values are set accordingly.
  • It is desirable to shoot in natural light, but what about taking group photos during the Christmas party? Let’s see how you can avoid washing out skin tones and Christmas lights when shooting indoors. If you have a DSLR, we recommend you to bounce flash off the ceiling or a wall. This way the light will be diffused and the flash won’t fire in everyone’s eyes.
  • Switch to Night mode if you don’t have a flash you can bounce.
  • Switch from auto White Balance to a more suitable preset for indoor shooting like incandescent or tungsten.

Recommended Photo Equipment: Wide Angle Lenses.

  • If you got yourself a wide angle lens (55mm max), the wide focal length will allow for perfectly taken group portraits. This type of lens is ideal if you want to shoot big family portraits as you can zoom out and capture wider scenes at the same time.

Recommended Read: Perfect Christmas Family Photo Ideas.

Chapter 2: Get in the Middle of the Action

Apart from all those traditional poses on everyone’s checklists, you can take one step further and try to be more spontaneous. There is no better occasion for taking candid photographs than Christmas.

Keep your camera close and take photos when friends and family expect less. Wait for them to be distracted or focus upon something that drew their attention like an ornament, book, or cookie.

Also, the key to candid photography is adding emotion to your images. Wait for everyone to get comfortable and absorbed in conversation. Then capture that natural, beautiful human interaction, and add a sense of story to it.

christmas candid photo

Spread the Christmas Cheer with Candid Photographs

Recommended Settings & Techniques for Stunning Candid Photos

  • Turn of the flash as there is nothing like it to ruin a spontaneous moment.
  • Take multiple shots as you never know which one is he perfect one.

Recommended Photo Equipment: Telephoto Lens.

A telephoto lens is ideal to get really close to your subjects without ruining their intimacy.

Chapter 3: Go Macro – The Magic Is in the Details

Don’t forget to focus on details and take a few close-ups which you can then transform into cute Christmas cards.

Recommended Settings and Techniques: Switch to Macro Mode.

Set your camera on Macro mode and focus on all the small things around the party that make a difference: tree ornaments, table and doorway decorations, holiday cookies and sweets.

Recommended Photo Equipment: Macro Lens. 

If you have a macro lens, now it’s the perfect time to practice using it for sharper and more detailed images.

Recommended Read: Food Photography Tips

Christmas close up on white candles

Going Macro with Your Christmas Photography

Part III: Get Yourself in the Moment

Chapter 1: It’s Time for Presents!

One of the key moments of a Christmas gathering is the opening of gifts. Now it is your opportunity to capture a wide array of emotions, moods, and facial expressions.

Recommended Settings and Techniques: Switch to Burst Mode

  • Set your camera to continuous shooting mode and take as many shots as possible. You will end up with series of photos that tell the story of each gift. Plus, the facial expression on everyone’s faces, be it joy or disappointment, is priceless.

Ask someone to photograph you as well when opening your presents. One of the mistakes photographers make is  missing from the holiday photographs. Take a break and enjoy the festive moments!

Chapter 2: Create Christmas Videos and Time-lapse Series

Christmas Selfie Photo

Christmas “Selfie”

To make your Christmas story more dynamic, you can also shoot videos with key moments, from early preparation stages to unwrapping gifts and partying.

You can also create time-lapse series for each moment mentioned above. This way you get to be part of the scene too.

Pro tip: place your camera in one corner of the kitchen to capture some baking fun moments, as well as in one corner of the room during the day. If you use multiple cameras, that’s even better.

Recommended Settings & Techniques for Shooting Time-Lapse 

  • Pay attention to framing. Visualize the scene before placing your camera on a solid surface where you can leave it for a few hours.
  • Perform the necessary settings according to the light you have available and other conditions that may alter the image quality. You can use manual exposure or set your camera on priority mode.
  • Have greater control over the results by shooting in RAW format. 
  • Focus according to the elements of interest you have in the foreground.
  • Choose the right lapse. The interval between the shots is important for determining how long the time-lapse will take. For a 10 second-footage you will need 300 frames (it takes 30 frames to create one second of video). Let’s say you will choose an interval of 5 seconds. Multiply it by 300 and you know how much time the time-lapse creation will take.

Recommended Equipment: Tripod

A tripod is a photographer’s best tool when shooting time-lapse or videos.

Recommended Read: DSLR Guide for Beginners – more tips on how to use your camera to its full potential.

Chapter 3: Sharing, Giving, and Receiving – Spread the Holiday Cheer

Your Christmas photography work doesn’t end up when your guests return to their homes or when your little ones go to bed. Your friends and family will be waiting for you to send them the holiday pics.

Besides sharing your best shots on Facebook and Instagram to get everyone excited, you can create an online gallery for them to see a selection of best pics and even download the ones they like the most.

Sample of Christmas Post Card

Christmasy Post Card Idea

Here is a nice post-Christmas gift idea for your loved ones: print out your best family shots to create a photo album or have them framed. Also, you could make nice holiday cards and send them to your friends by post. Besides the actual gifts, there is also the almost forgotten experience of holding photographs in one’s hands and that adds up to your holiday priceless moments.

To Be Continued…

We hope our Christmas photography guide will help you hone your skills and make your holiday photo session more enjoyable. Stay tuned! We’ll get back with some awesome New Year’s Eve photography tips and tricks.

Image Source: Bokeh Effect

TIPA Awards 2015: Best Photo & Imaging Products of the Year

When it comes to purchasing the best photo equipment out there, the immense number of camera, lens, and other photo accessories reviews can overwhelm the casual and even the more experienced photographer. Year after year, renowned photo equipment manufacturers compete in providing professionals with advanced technology and cutting edge performance. But how can you spot the best photo devices introduced on the market every year? This is where our contribution comes in. All you need to do is grab a cup of coffee and get ready to check out TIPA Awards 2015 for the best photo, video, and imaging products.

TIPA Awards: The Best Photo & Imaging Products in 2015

Have you ever considered looking at the winners of some of the most prestigious and influential imaging awards in the photography industry before renewing your photo equipment? Well, now you can take into account what TIPA’s (The Technical Image Press Association) technical committee has endorsed as best photo devices launched in the last 12 months in over 40 product categories.

tipa awards 2015

Note: TIPA gathers members from 28 photo magazines on five continents. There are 18 countries represented within the association. TIPA has a partnership with Camera Journal Press Club too, comprising 11 top Japanese photo magazines. A TIPA Award is considered one of the highest distinction for photo, video, and imaging products.

TIPA Awards 2015: Best Expert DSLR Zoom Lens Category

Winner: Canon EF 100-400mm f/4.5-5.6L IS II USM comes first as the best expert zoom lens of the year.

TIPA Awards 2015: Best Professional DSLR Lens Category

Winner: Canon takes first place in this category too with its EF 11-24mm f/4L UtraSonic Motor lens.

TIPA Awards 2015: Best Digital SLR Expert Category

Winner: TIPA editors endorsed Canon EOS-7D Mark II as the best digital camera in 2015. It came as no surprise to us, although it is quite a pricey option for enthusiasts. We’d say, though, that its 20.2 MP, solidly built body, DIGIC 6 processor, and 10 frames-per-second shooting rate, among other features, are worth the money.

tipa awards 2015 for best dslr camera Canon EOS 7d mark ii

Best Digital SLR Expert Camera: Canon EOS 7D Mark II

TIPA Awards 2015: Best Easy Compact Camera Category

Winner: It appears that Canon rules the category of compact digital cameras too, with its affordable and well-performing point-and-shoot devices. If you are looking to purchase a slim camera with a long range optical zoom and adaptive optical image stabilizer, Canon IXUS (ELPH) 160/165/170 will surely satisfy your needs.  

TIPA Awards 2015: Best Inkjet Photo Paper Category

Winner: Canson Infinity Photo Lustre Premium RC 310 gsm

TIPA Awards 2015: Best Photo Projector Category

Winner: The Epson EH-LS10000 Projector is prized for its increased sharpness, easy setup configuration, and advanced technology.  Also, it meets the needs of professionals filming not only in Full HD but also in 4K.

TIPA Awards 2015: Best Photo Scanner Category

Winner: The TIPA editors brought back this category based on the introduction of Epson Perfection V850 Pro on the market. If you are looking for a sturdy device, and for enhanced image quality at the same time, this is your best deal.

TIPA Awards 2015: Best Photo Printer

Winner: Glossy and matte prints, CD and DVD printing ability, USB, Ethernet and WiFi options, touchscreen panel –  Epson SureColor P600 has it all.

leica t mirrorless camera tipa awards 2015 for best design

Leica-T: Mirrorless Camera with Leica M Lens

TIPA Awards 2015: Best Design Category

Winner: We don’t know what to say about you, but this CSC camera has awed us. Leica T (type 701) is not only pleasing to the eye, as the TIPA editors put it, but also a pleasure to use. To bring into view just a few of its key features, the camera has a 3.7-inch touchscreen LCD, an APS-C 16.5 MP sensor, built-in GPS, and free app for remote shooting.

TIPA Awards 2015: Best Storage Media Category

Winner: Eyefi Mobi Pro

TIPA Awards 2015: Best Premium Camera Category

Winner:  The Fujifilm X100T has a few impressive features. While its integral lens is almost 35mm equivalent, it boasts a high-resolution viewfinder, advanced autofocus, and an amazing shutter speed of 1/32,000 second. Its built-in WiFi, customizable buttons, and Full HD filming capability are another three of the reasons why it occupies the first place in its category.

TIPA Awards 2015: Best Expert Compact Camera Category

Winner:  Fujifilm is also the winner of the best expert compact camera category with its X30 model. This is the ideal device to use for casual photography or for day trips. Apart from top capabilities for a compact camera such as a 12 MP 2/3-inch X-Trans CMOS II sensor, 1/4000 second shutter speed, and high ISO performance, the Fujifilm X30 weights only 423 g.

Fujinon expert zoom lens

Fujinon XF 16-55mm f/2.8-R-LM-WR Expert Zoom Lens

TIPA Awards 2015: Best CSC Expert Zoom Lens Category

Winner: Fujinon XF 16-55mm f/2.8 R LM WR deserves its top position for the following outstanding capabilities: a 24-84mm equivalent range, minimum focus distance of 30 cm (approximately 12 inches), weather resistant design, plus a quiet and fast autofocus.

TIPA Awards 2015: Best Photo Monitor Category

Winner: LG Digital Cinema 4K Monitor (Model 31MU97Z) was voted as the best photo monitor for its impressive color depths and management controls, as well as for its ultra high definition video editing capabilities and Adobe RGB support, among others.

TIPA Awards 2015: Best Imaging Innovation Category

Winner: Lytro Illum is an exciting imaging platform that allows you to play with exposure and diverse focusing effects in an image, to share photos as animations or export them in various formats like JPEG, 3D or MP4, or to explore other innovative video applications.

TIPA Awards 2015: Best Tripod Category

Winner: The Manfrotto BeFree Carbon series comprise in portable, compact tripods made of aluminium or carbon. Both versions of the model are light and easy to set up (they have lock/release leg extensions), and come in handy when shooting in low light conditions.

Nikon Cool Pix P610

Best Bridge Camera of 2015: Nikon Cool Pix P610

TIPA Awards 2015: Best Superzoom Camera Category

Winner: Nikon COOLPIX P610 is unbeatable by other bridge cameras on the market. With its remarkable ultra-zoom lens and high-resolution video capabilities (time-lapse video recording too), accompanied by special filter effects and built-in WiFi and GPS, this superzoom camera is definitely a winner.

TIPA Awards 2015: Best Digital SLR Entry Level Category

Winner: Nikon D5500 is perfect for hobbyists looking to get familiar with DSLR photography. The camera is lightweight and comes in a compact format. It has many remarkable features for an entry level SLR, as well as creative modes that allow you to add a special touch to your photos. Plus, its Vari-angle touchscreen LSD makes is ideal for shooting from difficult angles.

TIPA Awards 2015: Best Digital SLR Professional Category

Winner: Nikon D810 takes your photo experience to the next level. This full-frame format and full manual control camera has a remarkable resolution of 36.3 Megapixels, a CMOS sensor and an ISO range extendable to 51,200.  

TIPA Awards 2015: Best Portable Flash Category

Winner: A portable flash is a must-have tool for any pro in the industry. TIPA editors have endorsed Nissin Air System as your best choice this year.

TIPA Awards 2015: Best CSC Expert Category

Winner: Olympus OM-D E-M5 Mark ll sports a wide array of features such as an electronic viewfinder, touchscreen LCD monitor, and fast AF. It has an excellent performance in low light conditions and the world’s best technology when in comes to image stabilization. Plus, this mirrorless expert camera has a special option called “High-Res Shot” that combines 8 shots in a JPEG to a 40 MP resolution.

best csc expert camera tipa awards 2015

Best Mirrorless Camera: Olympus OM-D E-M5 Mark II

TIPA Awards 2015: Best Photo/Video Camera Expert Category

Winner: For a camera to be very good at both still image shooting and video recording, it should resemble Panasonic LUMIX DMC LX100. If you are looking at a camera for its video-related capabilities, then this is your best choice.

TIPA Awards 2015: Best Rugged Camera Category

Winner: It seems that Panasonic rules the rugged camera category too with its LUMIX DMC-FT6 (TS6) shockproof model. This compact camera is specially designed for adventurous photographers. It handles temperatures as low as -10 C/ 14 F, underwater depths of 13 metres (43 feet) and drops from 2 metres (6.6 feet).

TIPA Awards 2015: Best CSC Advanced Category

Winner: With an incredible shutter speed range between 1/16,000 and 60 seconds, a Digital Live View MOS Sensor capable of 16 Megapixels and high ISO support up to 25,600, Panasonic LUMIX DMC-GM5 has conquered the admiration of TIPA editors and got a well-deserved first place in the CSC advanced category.

TIPA Awards 2015: Best Medium Format Category

Winner: A dream for wedding and portrait photographers, Pentax 645Z sports a large sensor delivering 51.4 MP, a 1.037 million RGB dots LCD monitor, an anti-reflection coating reducing reflection, a large optical finder and an ISO support that can be expanded to 204,800. Has it convinced you? Well, it costs around 8 grand.

TIPA Awards 2015: Best Digital SLR Advanced Category

Winner: Pentax seems to make its mark in the best digital SLR advanced category too with the K-S2  model. TIPA editors recommend it to first-timers for its broad set of features. The camera is pretty tech packed too and comes with an app and built-in WiFi to help you transfer and organize pics.

pentax-ks2 advanced digital slr camera

Best Advanced DSLR: Pentax KS2

TIPA Awards 2015: Best Imaging Software Category

Winner: In 2014 Photoshop has lost in favor of DxO ViewPoiny 2. This year, the PhaseOne Capture One Pro 8 was voted as the best photo software for the way it handles RAW conversion. Images can be imported either from cards and drives or by means of remote operation. There’s an option for clients too, who can watch the shoot remotely through Capture Pilot. Photo sharing and web galleries creation are also available.

TIPA Awards 2015: Best Professional Lighting System Category

Winner: Profoto B2 – the Off-Camera Flash that distinguishes as the best lighting systems for professional shooting.

TIPA Awards 2015: Best ActionCam Category

Winner: Ricoh WG-M1 – the waterproof, shock resistant camcorder any active professional would enjoy using.

TIPA Awards 2015: Best CSC Professional Category

Winner: Samsung NX1 has an impressive ISO range extendable at 51,200, a 4k video recording capability, and a hybrid, versatile AF system. Also, this  compact system camera gets a high mark for its ability to capture 120 fps at full resolution.

Sigma 150-600mm DG OS HSM advanced Lens

Best CSC Pro Lens: Sigma 150-600mm DG OS HSM

TIPA Awards 2015: Best Entry Level DSLR Lens Category

Winner: SIGMA 18-300mm F3.5-6.3 DC MACRO OS HSM | Contemporary is a portable, long range zoom lens suitable for a wide range of shooting situations. Its optical stabilization system improves on image quality while its size makes it perfect for those new to DSLR photography.

TIPA Awards 2015: Best Expert DSLR Prime Lens Category

WinnerSIGMA 24mm F1.4 DG HSM | Art is a lens specially designed to enhance aperture performance and brightness.

TIPA Awards 2015: Best Mobile Imaging Device Category

Winner: Sony ILCE-QX1 offers quite a unique experience to smartphone photographers. This is a mirrorless lens-style camera that can be attached to your smartphone by using an adapter or used independently. In such case, your mobile acts as a viewfinder through a WiFi or NFC connection. As it is a lens-camera it can store the images it takes, bit these can also be stored on the smartphone.

TIPA Awards 2015: Best CSC Entry Level

Winner: Sony ?5100 is super compact even for a compact system camera. It has a wide array of powerful features, and it is very easy to handle. It is also our recommendation for casual photographers looking for well performing yet small sized cameras.

TIPA Awards 2015: Best Photo/ Video Camera Professional Category

Winner: Sony a7 S is a professional video camera valued for its high dynamic range and low light capabilities. Its high ISO support extends incredibly up to 409,600.

TIPA Awards 2015: Best CSC Entry Level Lens Category

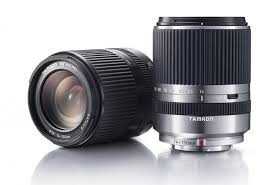
Winner: Tamron 14-150mm F/3.5 – 5.8 Di III – Mirrorless cameras come with the promise of a more portable photo experience, and so does the CSC entry level Tamron 14-150 mm lens. Lightweight and measuring only 80.4 mm in length, the lens comprises 17 elements in 13 groups, and it is perfect for close up for its minimum focusing distance of 0.5 m (1.64 feet).

Tamron 14-150 mm entry level Lens

Best CSC Entry Level Lens: Tamron 14-150 mm f/3.5 – 5.8 Di III

TIPA Awards 2015: Best Photo Bag Category

Winner: Think Thank Photo Airport International LE Classic was designed with one thought in mind: to make photographers’ travels more enjoyable, at least when it comes to carrying photo equipment. TIPA editors believe the product serve its purpose. For the record, the waterproof roller bag accommodates everything a photographer needs: two DSLR bodies, up to a 500mm lens plus additional smaller lenses, flash and accessories, and, of course, a laptop (a 15- or 17-inch device).

TIPA Awards 2015: Best Accessory Category

Winner: Nature photographers, you will love this accessorise! The UniqBall Ball Head comes in handy in diverse photo shooting situations. The heads come with a quick release plate and case.

TIPA Awards 2015: Best CSC Prime Lens Category

Winner: Voted as the best CSC prime lens on the market in 2015, Zeiss Loxia Line consists of manual focus lenses made for Sony full-frame cameras. The line targets photographers passionate about the image-making process.

TIPA Awards 2015: Best Photo Service

Winner: Zenfolio delivers best photo services in 2015 both off- and online, from marketing tools (customized blog templates, portfolios) and transactional services to photo books, stamps, and personalized items.

How do TIPA representatives assess and endorse each photo, video, and imaging product? Let’s take a look at the criteria these professionals take into account before giving their vote of quality and trust to the very best product in its category.

It is important to mention that TIPA members test and evaluate the devices considering aspects such as design, ergonomics, innovation, ease-of-use, as well as the value for money (price/performance ratio). For their opinion on the products to be as informed as possible, editors invite manufacturers who wish to enter the quest for a TIPA award to send them a sample of their product.

For more information on TIPA Awards 2015 or previous top photo equipment selections, you can visit TIPA’s official website. Endorsed products can be searched by category, manufacturer, and year.

Is there a product in the list you have tried out or consider purchasing it? If you have any thoughts you’d like to share with us, you are welcome to leave a message in the comment section below. Cheers!

Image Source: 1, 2, 3, 4, 5, 6, 7, 8, 9.

Interview with Cato Lein: Poetry in Black and White Photographs

Cato Lein is a Swedish photographer born in Båtsfjord, Norway, not far from where the Russian Tundra ends. Author of intense, original, and sometimes even disturbing images, he is a master of BW photography.

What defines his art is the belief in artistic freedom and the power to surprise viewers with a different, personal, yet neutral approach to the art of portraiture. When looking at Cato’s black and white portraits, Ted Grant’s words spring to my mind:

When you photograph people in color, you photograph their clothes. But when you photograph people in Black and white, you photograph their souls! [Ted Grant, Canadian photographer and photojournalist]

Cato Lein’s work portrays authors and artists from around the world, but also unique narratives of seemingly forgotten landscapes.

His portraiture is pure poetry. His craft – testing the limits of the possible. 

Cato Lein Portrait taken by Knut Koivisto

Cato Lein. Photo Credits: Knut Koivisto

To be a Photographer is like being a Pianist. You have to practice every day. [Cato Lein]

G.M. Could you please tell us about your first encounter with photography? What made you start as a photographer?

C.L. It was when I moved to Stockholm, and saw the great American photographers Richard Avedon, Irving Penn and Diana Arbus on exhibition – The Essence of Black& White Photography.

John Fosse photo by Cato Lein

John Fosse, Author and Playwriter, 2015 © Cato Lein

G.M. You have taken portraits of people from different corners of the world. How do you interact with your subjects? Is language ever a barrier?

C.L. It should be a barrier, but I never had that problem. I have a Camera and they understand.

portrait of Madalina Ghitescu by Cato Lein

Madalina Ghitescu, Romanian Actress © Cato Lein

G.M. How do you choose the location for your projects? Is there anything that fascinates you about Eastern Europe?

C.L. I never like seasons on the pictures, I try to keep it neutral. Eastern Europe has a great history (Architecture, Streets) to fill in the background. Also a nostalgic touch that is gone a long way back.  In “Western Europe” everything is so clean and mainstream…

photo by Cato Lein at Centrum for fotografi

Stockholm © Cato Lein

I´m not a Teknik Photographer. More emotional and on intuition.  [Cato Lein]

G.M. What camera gear do you currently use? Do you take with you any additional equipment on a shooting day?

C.L. I use two analogue cameras. Nikon. Digital: Fujifilm x-pro1. Never flash.

G.M. How much time do you spend on retouching your shots? How important is post-processing in your work?

C.L. When I do the Photoshoot, and see the situation we are in, I can see what kind of Atmosphere I will work for in the retouching after. I work very easily in Photoshop. I´m not a Teknik Photographer. I am more emotional and on intuition.

the singer photo by cato lein

The Singer © Cato Lein

G.M. Where do you find inspiration? Could you name a few photographers that you consider influential for your style?

C.L. I love Japanese Photography. Yutaka Takanashi, Takuma Nakahira and Daido Moriyama, to name a few.

portrait of Katarina Wennstam by Cato Lein

Katarina Wennstam, Author © Cato Lein

G.M. How would you define your photography in three words?

C.L. Intuition, Heart, and Curiosity.

G.M. If you could start again as a photographer is there anything you would do differently? Are there any sectors you’d like to explore more?

C.L. No! I work the same way as when I started, and I´m still proud of those first ones.

In the Alley, Marseille © Cato Lein

In the Alley, Marseille © Cato Lein

G.M. If it weren’t for photography, what else would you do?

C.L. I had so many jobs and education before Photography – Bricklayer, Offset-printer and Hospital worker.

G.M. Any words of wisdom for photography enthusiasts at the beginning of their journey?

C.L. To be a Photographer is like being a Pianist. You have to practice every day. 

The Northern Silence Project by Cato Lein

Batsfjord, The Northern Silence Project © Cato Lein

G.M. Can you tell us a bit about your future projects?

C.L. I am happy to be finished with my long-time project that I started in 1984 – “The Northern Silence”. I will have an Exhibition in Katowice, Poland with those pictures, hopefully, a book as well. I will also have an exhibition in Stockholm next year with my Poland story “Black Soil”. I hope I will finish my 5 different projects next year.

Needless to say, Cato Lein is one of the portrait photographers out there that I admire the most. I wish to thank him for the wonderful opportunity of gaining more insights into his work.

Black Soil, Katowice, Poland by Cato Lein

“Black Soil” Project, Katowice, Poland © Cato Lein

Discover more of Cato’s work on his official website, Facebook, Instagram, and Tumblr.

Disclaimer: this interview has been proofread and slightly edited for style purposes. All images featured in this post belong to Cato Lein and are protected by copyright. Exception makes Cato’s portrait taken by Knut Koivisto.

Interview with Sarajevo-Based Photographer Maja Topcagic

Maja Topcagic is an unconventional freelance photo retoucher and one of the most inspirational portrait photographers of the new generation. Currently based in Sarajevo, Bosnia and Herzegovina, she works as a self-taught professional, holding a degree in a completely different field: Mathematics and Computer Science. For Maja, taking and editing photos is all about dedication, passion, and love. “I think you can feel it when you look into my photography”, she says. And she is right.

Her creative portraits have been featured in major photography magazines like Digital Photo UK, EOS Magazine, Photography Week, Digital Camera China and Popular Photography. Also, her beautiful photos have been showcased in many digital exhibitions and been published on book covers worldwide.

Portrait of photographer Maja Topcagic

Maja Topcagic: Sarajevo-based Portrait Photographer and Retoucher

Being different is beautiful. [Maja Topcagic]

G.M. Could you please tell us about your first encounter with photography? What made you start as a photographer?

My first DSLR was given and sent to me as a gift, by a person that I actually have not met! That was one of the most beautiful moments in my life; I finally could pursue my love for photography. Back then, I was taking photos with my mobile phone, Sony Ericsson k8ooi, and I would retouch them in Photoshop. Then my dream came true. From that day, I always say: ´If you dream about it long enough, it will come true.´

I am entirely self-taught photographer and retoucher. I never took classes, but I have learned some things online. The thing that led me to all I know is experimenting. Even if you make a mistake, you have learned something, and gained experience, which is precious.

Portraits with a Soul: The Story Behind Maja Topcagic’s Photography

Maja Topcagic Portrait Photography

G.M. Your ‘Freckled’ portraits are hauntingly beautiful. Who is the redhead ‘inspiration’ behind the project and what made you choose this theme?

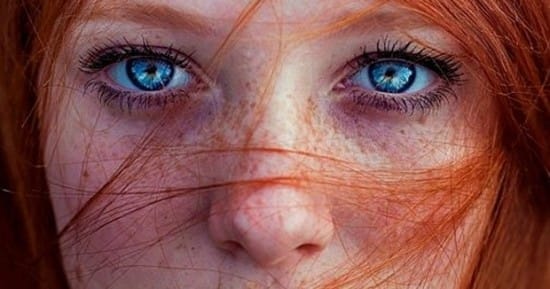
The model on most of my photos is beautiful Asima Sefic, a redhead with freckles and blue eyes, who become my greatest inspiration. The facts say that only 2% of the population on Earth has that combination. These images are part of a personal project that I started almost two years ago. My redhead database is still growing month by month.

Freckles used to be considered undesirable and unsightly, but today they have reached full splendor in the world of photography.

I want to show the world that if something is different, it doesn’t mean it is ugly or wrong. The real beauty is in being different, and redheads with freckles really are. I´ve got a lot of emails saying thank you for showing the beauty in redheads with freckles, because they were a subject of laughter in their childhood and after. I´m glad I made some people smile watching my photos! It makes me smile too :).

Freckles Maja Topcagic Photography

Freckles © Maja Topcagic

G.M. What camera gear do you currently use? Do you take with you any additional equipment on a shooting day?

Now I use Canon 5D Mark III digital camera, Canon 85mm f/1.8, and 50mm f/1.4 Canon lenses. I mostly use natural light in combination with a portable silver aluminium reflector. It´s a very cheap thing that you can carry around in your rucksack, but it gives awesome results with natural light!

G.M. How important is post-processing in your work? Is there an editing software you prefer using?

I edit photographs in excellent Adobe Photoshop CS6. I do a lot of retouching, and I’m used to spending 10 hours or more in front of my computer editing photos. Programs for processing photos release a person’s creativity and allow you to be different from others. I love to compose several photos into one, or play with multiple layers.

Freckles Maja Topcagic Photography

Freckles © Maja Topcagic

G.M. Where do you find inspiration?

I find inspiration just by passing down the street. I imagine moments frozen and captured by camera. Also, I write down my dreams. Sometimes an idea bumps me in the head, but mostly I find inspiration looking the world through my eyes. Most often it is interesting, weird, and extraordinary. Movies, books, music, videos, ordinary people and conversations inspire my work too.

G.M. How would you define your photography in a few words?

M.T. Creative portraits with soul.

Follow your heart. Do what you love and love what you do. Because. When you do what you love, you don´t have to work a single day in your life!

G.M. If you could start again as a photographer is there anything you would do differently? Are there any sectors you’d like to explore more?

M.T. I would like to travel some more. I would like to have the opportunity to be a professional photographer and retoucher. Even though it ?s pretty hard to achieve that in my country, I will put my effort in it, and really try to change it!

beautiful freckled model

Freckles © Maja Topcagic

G.M. If it weren’t for photography, what else would you do?

M.T. Photography changed my life completely. If I didn´t fall in love with photography, I´d be a teacher of math and computer sciences. But I always knew I would somehow be involved in the process of creating art.

G.M. Any words of wisdom for photography enthusiasts at the beginning of their journey?

M.T. The most important thing is that you don’t need to have the best camera and a lot of lenses, it’s the e m o t i o n s that count. If you make an artwork, which will touch other people’s hearts, then you have succeeded. Follow your heart. Do what you love and love what you do. Because. When you do what you love, you don´t have to work a single day in your life!

Beautiful Redhead - photo by Maja Topcagic

Freckles © Maja Topcagic

G.M. Can you tell us a bit about your curent and future projects?

A few projects are coming very soon. But I must keep them a whisper. I can only say that one involves publishing a ´Freckled´ book, and the other bigger project is finished, and it involves Canon Europe. I can´t say much more! :) Also, I traveled to New York City in August, so if anyone wants to collaborate with me, feel free to email me.

Thanks to Maja for the opportunity to discover more about Freckles, her spectacular photo project that travelled the world. Discover more of her beautiful portraits on Maja Topcagic Photography website, Facebook, Instagram, 500 px.

Disclaimer: This interview has been proofread and lightly edited for style purposes. All photographs featured here belong to Maja Topcagic and are protected by intellectual rights.

Interview with Travel Photographer Colin Roohan

Colin Roohan is a passionate travel photographer and one of the brilliant professionals I had the opportunity to interview this year. His photographs showcase vivid and rich cultural experiences documented along his travels around the world, from Peru to Croatia and all the way to India, Vietnam, and United Arab Emirates.

More than that, they capture what the photographer calls “moments of true bliss”:

Moments of true bliss typically occur while I’m traveling, whether conversing with a sadhu or belting out “99 Luftballoons” in a singing room packed with Koreans, I am at peace – my chi nice and centered.

Colin Roohan is a creative individual who has the power to inspire those who witness his work. So, let’s discover more about the story behind his craft and travel experiences.

Portrait of Colin Roohan Travel Photographer

Colin Roohan – Travel Photographer

G.M. Could you please tell us about your first encounter with photography? What made you start as a photographer? 

C.R. My mother was an avid photo hobbyist so growing up I constantly remember wanting to use her camera. There is something so tactile about old SLRs; you want to pick them up and play with them. Later in life, I moved and worked in Seoul, South Korea for a few years. It was here that I truly immersed myself in the craft. I became part of large ex-pat photo group and began competing in competitions and joining photo-shoots to learn all that I could from a great group of talented people.

G.M. What is your favorite travel photography destination? 

C.R. I would have to say India. It is a place that is very challenging to travel in, but I feel that makes any valuable material you shoot there more rewarding. In addition to that, South America has been good to me as well. The people and the scenery are phenomenal there, and I feel it is a country that evokes so much emotion in every facet of life.

Nashik, India, Travel Photograph by Colin Roohan

Nashik, India © Colin Roohan Photography

G.M. What project is held dearest to your heart and why? 

C.R. I worked on a book that documents the Seoul subway system, and that will always have a place in my heart. It was the first big project I worked on and it really helped me elevate my photography as I started to cater and conceptualize my work toward publication.

G.M. How important is post-processing in your work? Is there an editing software you prefer using? 

C.R. I’d don’t put a huge emphasis on post because honestly I find it boring. I generally use Lightroom and enjoy the occasional VSCO preset. To be frank, though, I try to get the image right the first time in-camera that allows me to spend less time on the computer and more time in the field.

Squid Boats by Colin Roohan

Squid Boats, South Korea © Colin Roohan Photography

G.M. What camera gear do you currently use? Do you take with you any additional equipment on a shooting day? 

C.R. I generally travel with a few Nikon DSLR bodies, a few prime lenses and a mid-length zoom. Most of my assignments require me to be out on my feet for roughly 10-12 hours a day so I cannot be burdened by cumbersome gear. Other than the cameras a speed light and a tripod are the other items I sometimes bring along.

G.M. Where do you find inspiration? Could you name a few photographers that you consider influential for your style? 

C.R. I love a lot of classic photojournalists: McCurry, Abercrombie, Smolan. In addition to those guys Flash Parker and Chris Burkard‘s works always move me.

Colin Roohan Travel Photography

© Colin Roohan Photography

G.M. How would you define your photography in three words? 

C.R. Nostalgic, classic, reminiscent.

G.M. If you could start again as a photographer is there anything you would do differently? Are there any sectors you’d like to explore more?

C.R. I wish I would have studied photography in school and earned a degree in the field. I think having a diploma would have opened up a few doors for me along the way.

Photograph by Colin Roohan

© Colin Roohan Photography

G.M. If it weren’t for photography, what else would you do?

C.R. I love surfing but, funnily enough, I never take a camera with me to a session. I love being able to enjoy life and unwind; leaving my camera, phone, other gadgetry behind.

G.M. Any words of wisdom for photography enthusiasts at the beginning of their journey? 

C.R. Shoot a lot! When you first start out shoot as much material as you can; try different cameras, different films, different subjects. It is important to experiment when you’re first starting, and I think it can play a vital part in helping you narrow down an area you may want to really focus on.

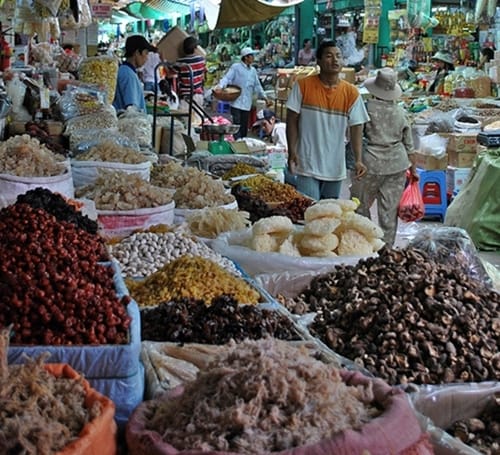
picture of cholon market by colin roohan travel photographer

Cholon Market, Saigon Vietnam © Colin Roohan

G.M. Can you tell us a bit about your current and future projects?

C.R. My recent assignments have been for a large organization based in the USA that helps countries grow their tourism sector. In May, I went to Peru and in August to Brazil.

Thanks to Colin for sharing his experience and enthusiasm for travel photography with us. Discover more of his beautiful photographs and projects at Colin Roohan Photography, on Facebook, Twitter, or Tumblr.

Disclaimer: All photographs featured in this interview belong to Colin Roohan and are protected by copyright.

Create a Stunning Dreamlike Portrait in 9 Steps – Photo Manipulation Tutorial

Are you looking for something to make your photographic work stand out of the ordinary? Do you wish to improve your Photoshop skills? This step by step Photoshop photo manipulation tutorial will teach you how to turn your portrait into an eerily beautiful piece of art. Let’s get it started!

Step 1: Select the Original Portrait

Open the picture you want to transform in Photoshop. Once opened in Camera Raw, you will need to adjust contrast and luminosity.

Before that, however, you will need to copy the layer. Right-click on it and select “Duplicate Layer”. You can use the Ctrl + J command for this as well.

Photo Manipulation Tutorial Image 1

Name this layer (I have named it “Pic 1”), and then hit the OK button. It will appear in the Layers Menu located at right side of the screen.

Photo Manipulation Tutorial Image 2

Step 2: Adjust Luminosity & Contrast

To modify luminosity and contrast, click on the Image drop-down menu at the top of the page, select Adjustments, and then Brightness/ Contrast. For my portrait, I have set Luminosity to -33, and contrast to -4.

Photo Manipulation Tutorial Image 2 a

Note that these values vary depending on the picture’s background. It is important to perform these adjustments until you achieve a contrast to your liking between the background and the subject of your pic.

Photo Manipulation Tutorial Image 2 b

Step 3: Set Color Balance

The third step is nice and simple. As previously done, click on the Image Menu, select Adjustments, then Color Balance (the Ctrl + B command works fine too), and be ready to edit the color levels and tones.

Photo Manipulation Tutorial Image 3 a

I’ve set Cyan to +21, Magenta to -4, and Yellow to 0.

Photo Manipulation Tutorial Image 3 b

If you wish to accentuate contrast, select Curves from the same options menu, and drag the curve line downwards as in the picture below.

Photo Manipulation Tutorial Image 3 c

Step 4: Dodge and Burn the Image

Things get a bit more complicated as you grab the Dodge Tool found in the Tools panel. Following this move, you have to set Range from the options bar at the top of the page. Click on Highlights, set Exposure at 50% and uncheck the Protect Tones feature as shown in the pics below.

Photo Manipulation Tutorial Image 4 a

Photo Manipulation Tutorial Image 4 b

Photo Manipulation Tutorial Image 4 c

Next, you will have to paint over the background with a soft-edged brush tip until it gets white. While painting maybe you will need to resize your brush tip.

Photo Manipulation Tutorial Image 4 d

Step 5: Apply the Second Image

Bring on the eery element! Click File, select a picture to your liking, and click OK. I’ve chosen a tree image in order to achieve a fairy tale effect. I have named it tree0, and will refer to it again at step 7.

Photo Manipulation Tutorial Image 5 a

Right-click on the newly created layer and select Rasterize Layer. Don’t forget to hit the OK button.

Next, go to the Blend Mode Menu at the top of the Layers panel and select Screen. Now the tree picture will combine with your portrait as featured below.

Photo Manipulation Tutorial Image 5 b

Following this move, you’ll need to select the Free Transform mode. You can use the Ctrl+T command.

Now, to cover the portrait with the trees, and find the perfect angle at the same time, you will need to rotate and resize the layer. When ready, press Enter to apply your edits.

Step 6: Tone the Image

This action implies converting the image to near-monochrome. To perform these toning edits, you have to click the Create New Adjustment Layer icon in the Layers Panel. Next, select Gradient Map. Go to the Properties Panel, and click the gradient preview menu. Hit the cog icon and select Photographic Toning.

Next, click Append, and select the Cobalt-Iron 2 preset.

Photo Manipulation Tutorial Image 6 a

Step 7: Increase Contrast

Now, as you probably imagine, the contrast of the newly created image needs a boost. Here’s what to do:

  • Click Create New Adjustment Layer icon.
  • Select
  • Draw an S-shaped curve – the more pronounced the S-shaped curve, the greater the contrast.

Photo Manipulation Tutorial Image 7 a

After you have created this layer (I have named it ”Curves 1”), drag it down until it gets between the Gradient Map layer and the tree0 layer. Right-click Curves 1 and select Create Clipping Mask. Now, this layer will be subordinated to the tree0 layer, and all edits will apply only to it.

Photo Manipulation Tutorial Image 7 b

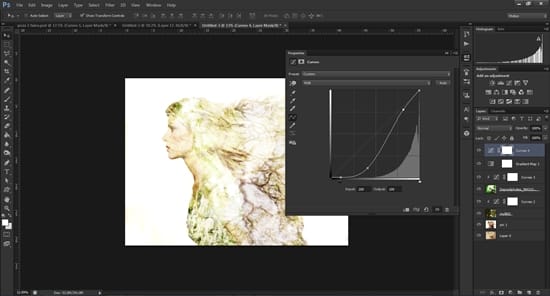
If you wish to boost the contrast more, create a new layer and play with the Curves function.

Photo Manipulation Tutorial Image 7 c

Photo Manipulation Tutorial Image 7 d

Step 8: Bring on the Third Image

For the second tree image, we’ll repeat all moves from Step 5: Click on File, select the picture you wish to add, and hit the OK button. Right-click on the new image, and select Rasterize Layer.

Photo Manipulation Tutorial Image 8 a

As we did with the first tree image, we need to transform the layer. The Ctrl+T command will allow you to enter the Free Transform mode. If you can’t see the edges of the bounding box, the Ctrl+0 command will bring them into view again.

Next, as you already know, you have to rotate and resize the new layer so that it works well with the other pics. Once you achieved the desired results, press Enter to apply all editing changes.

As a tip, try not to blend the new pic with the other ones too much, so that the subject remains perceivable.

Step 9: Final Retouch & Result

To better observe the details of the newly created layer, apply a new filter. Click on New Adjustments Layer icon, and select Hue/ Saturation.

Photo Manipulation Tutorial Image 9 a

I’ve made the following modifications: Hue -24, Saturation -1, and Lightness +6. Right-click the new layer, choose Create Clipping Mask.

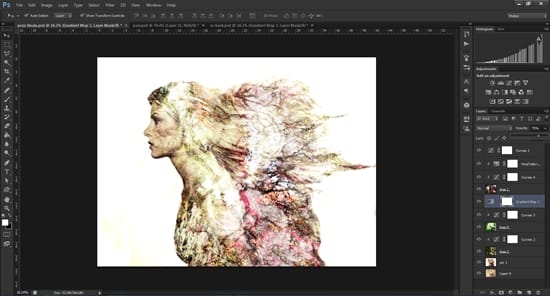
You should work on Opacity levels too. I’ve modified the opacity of the Gradient Map layer to 75% so that to keep the skin tones of the original portrait visible.

Photo Manipulation Tutorial Image 9 b

Here is the outcome: an incredible dreamlike portrait!

photo manipulation tutorial final result

Now that we have approached each step and technical aspect of turning your portrait into a dreamlike masterpiece, you may look for further inspiration. There are many imaginative photographers who, for instance, took self-portrait photography to another level by adding a surreal touch to their work.

To drop a few names, Joel Robison, Zev (also known as Fiddleoak), and Erik Johansson will blow your mind away with their magnetically surreal photo manipulations.

I hope this photo manipulation tutorial will stimulate your creativity and help you to refine your Photoshop skills. If you have any other creative ideas, I’d love to hear from you. Fill free to contact me for any questions, ideas, or suggestions. Let’s share the joy of playing with dreamlike photo manipulation techniques. Cheers!

Interview with Fashion Photographer Alessio Bolzoni

Alessio Bolzoni is one of the avant-garde fashion photographers redefining both the concept of beauty and visual art in the fashion industry today.

“The real challenge for me is to find a way to do something new and unique.” [Alessio Bolzoni]

Born in Crema, in 1979, the Italian photographer is now based in Paris, France. Alessio has received international acclaim for his high style, yet simple and elegant fashion photography. His work has been widely featured in top publications like Marie Claire, Elle US, Harper’s Bazaar UK, Grey Magazine, Numero, Glamour, Stylist Magazine, Vogue Russia, and many more. If you take a look at his portfolio, you can see client names such as Dior, Kris Van Assche, and Bruno Magli.

Alesssio Bolzoni's photo for Stylist Magazine 2015

Stylist Magazine, January 2015, “Courir le risque” © Alessio Bolzoni

Inspired by cinematography, theatre, street life and street photography, Alessio transforms images into dynamic pieces of art. His philosophy is to be truthful to himself, as well as to capture reality in a precise and energetic manner.

Let’s discover more about the vision behind Alessio’s photographic art and style.

G.M. Could you please tell us about your first encounter with photography? What made you start as a photographer?
A.B. The first thing I needed to shoot was the reality. I was 14. And everything around me was interesting. The microcosm was my macrocosm: flowers, my town, bees.

photo by Alssio Bolzoni, fashion photographer for Marie Claire Italy 2013

Marie Claire Italy, May 2013, “Promenade, una giornata open air” © Alessio Bolzoni

G.M. What are the challenges of working as a fashion photographer?
A.B. The real challenge for me is to find a way to do something new and unique. I sometimes achieve it, and those are great moments.
G.M. What project is held dearest to your heart and why?
A.B. I think it is the work for Kris Van Assche. Mauricio (Nardi, the stylist) and I were totally free to create the images of the campaigns, and Kris supported our ideas.

backstage photo - Kris Van Assche's spring campaign 2014

Alessio Bolzoni shooting for Kris Van Assche’s Spring campaign, 2014 © The Kinsky

G.M. How important is post-processing in your work? Is there an editing software you prefer using?
A.B. The editing part is very important to me. I capture pictures in movement so that the selection creates a story. So, I spend a lot of time on it. Then the retoucher knows my taste. We discuss the light and colors, but he knows I like a light retouch on the images.

G.M. Where do you find inspiration? Could you name a few photographers that you consider influential for your style?
A.B. My inspiration are the streets, the real life, movies, theaters and the street photography from the 60s and 70s, but also the contemporary one. They all capture movements in a natural, realistic way. Photographers that have influenced my work: Friedlander, Winogrand, Meyerowitz, Kitajima, McDonough, Graham, Valerie Jouve, Eggleston.

photo by Alessio Bolzoni, fashion photographer, for Bon Magazine 2015

Bon Magazine, 2015, “I spin so ceaselessly” © Alessio Bolzoni

G.M. How would you define your photography in three words?
A.B. Dynamic, energetic and elegant. 

G.M. If you could start again as a photographer is there anything you would do differently? Are there any sectors you’d like to explore more?
A.B. I always admired the reportage photographer. The wars and social investigations reportages are important historical testimonials. They do an incredible work.

photo by Alessio Bolzoni for Marie Claire Italy Nov 2014

Marie Claire Italy, November 2014 © Alessio Bolzoni

G.M. If it weren’t for photography, what else would you do?
A.B. I think I could be a cook. Cooks’ kitchens are their protected world. It would be nice to have a smaller world to live in.

G.M. Any words of wisdom for photography enthusiasts at the beginning of their journey?
A.B. Find yourself. Your unique point of view it’s the key. Find it. Be faithful to yourself.

photo by Alessio Bolzoni for Emilio Pucci

Emilio Pucci Resort 2016 © Alessio Bolzoni Photography

G.M. Can you tell us a bit about your future projects?
A.B. I am working on a book of flowers. It’s a small project on reality, life and death; Identity somehow. It’s almost done. And I’ll start another one soon. Something closer to my research.

Many thanks to Alessio for taking the time to participate in my interview and share insights into his magnificent work. Discover more fascinating photographs and projects on his official website.

Disclaimer: This interview has been lightly edited and proofread for style purposes.

Photographs featured on this post belong to Alessio Bolzoni and are protected by copyright.  The picture showcasing the photo shooting for Kris Van Assche belongs to TheKinsky.com.

Interview With Travel Photographer Chee Keong Lim

The Malaysian travel photographer Chee Keong Lim is an artist guided by a clear vision: to present nature and human nature with all honesty.

“I hope my work is not only beautiful but also shows kindness and captures the reality and truth of the moment the camera clicks”. [C.K. LIM]

What captures the viewer’s attention when looking at Lim’s photographs for the first time is a sense of natural beauty, purity and powerful energy. Dynamicity and stillness, fearlessness and candor are just two sets of opposites magnificently featured in Chee Keong Lim’s art.

I wish to thank Lim for another rewarding and inspirational interview. Let’s discover more of his incredible work and photographic experience.

Playtime in Indonedia captured by Chee Keong Lim

‘Playing’ © Chee Keong Lim – 1st Place Winner of LensCulture Exposure Awards 2013

G.M. Could you please tell us about your first encounter with photography? What made you start as a photographer?

C.K.L. I have loved photography since I was little. To be exact, my passion for photography started when I was in secondary school. At the time, I had always wanted to capture the beauty of the world. With my poor artistic skills, I couldn’t do it with a pen. Therefore, I started looking into learning photography. To me, a camera can record a beautiful moment and capture more than what words can describe. This is what motivated me to learn photography.

On the Way Home Photo Taken by Chee Keon Lim in Myanmar

‘On the Way Home’ © Chee Keong Lim, Myanmar

G.M. What is your favorite destination for travel photography?

C.K.L. My favorite country to go for travel and photography is Myanmar. Its rustic beauty and simplicity makes it the top of my travel list. When I first stepped into the country, I knew I will go again. Right now, I am preparing for my forth visit to Myanmar to take some awesome pictures.

G.M. How do you choose the location for your projects?

C.K.L. Whenever I plan for a photography trip, I start setting up the theme. Is it going to be scenic, architectural, or people-oriented? So far, I have focused mostly on the people and culture of the country I have visited. For this reason, Asia has been my travel choice. Besides Myanmar, Yunnan and Indonesia are also my favorite places for photography.

Beautiful sunrise photograph taken by Chee Keong Lim in China

Sunrise in Yuang Yang, China © Chee Keong Lim

G.M. How important is post-processing in your work? Is there an editing software you prefer using?

C.K.L. I love to remind myself: THINK BEFORE YOU SNAP! The composition, the light and shadow etc., along with good planning will lead to good pictures. Instead of spending lots of time on editing, I rather spend time thinking over the composition and pay attention to the details when the photo is taken. Nevertheless, editing is still a part of my production process. Adobe Photoshop and Lightroom are the software programs that I use.

G.M. What camera gear do you currently use? Do you take with you any additional equipment on a shooting day?

C.K.L. The model of the camera I use is Canon EOS 1DX. My favourite lenses are 8-15mm, 16-35 mm, 24-105mm and 70-200mm, and few other fix lenses. I rarely take all of them with me when I travel except for the zoom lens and fisheye lens.

'Alone' Photo by Chee Keong Lim - Silver SALON Medal

‘Alone’, Malaysia © Chee Keong Lim – Silver SALON Medal

G.M. Where do you find inspiration?

C.K.L. Besides traveling and photography, I also enjoy reading. I believe enriching one’s knowledge can enrich what he produces.  A picture will tell the viewer what the photographer thinks, that’s why people say a picture is worth a thousand words.

“I still wish to learn more about art so I can improve my understanding of beauty.” [CK LIM]

G.M. How would you define your photographic style in three words?

C.K.L. I have been striving to portray sincerity, kindness and beauty through my works. I hope my work is not only beautiful but also shows kindness and captures the reality and truth of the moment the camera clicks.

Winning photograph by Chee Keong Lim for Open Portfolio 2015 Tera Bella Media Contest

Winning Entry for Terra Bella Media Open Portfolio 2015 © Chee Keong Lim

G.M. If you could start again as a photographer is there anything you would do differently? Are there any sectors you’d like to explore more?

C.K.L. If I were to start over, I would have spent more time strengthening my foundation in arts. Up until today, I still wish to learn more about art so I can improve my understanding of beauty.

“A serious attitude towards each shot will determine the depth of your picture”. [CK LIM]

G.M. If it weren’t for photography, what else would you do?

C.K.L. I love photography, without it, I think I would feel very empty. If I had to choose another occupation, I hope I could help people through reading and travelling. Perhaps hosting events and share my experience.

Beautiful sunset picture taken by Chee Keong Lim in Myanmar

Myanmar © Chee Keong Lim

G.M. Any words of wisdom for photography enthusiasts at the beginning of their journey?

C.K.L. Think before you snap. Every time before I take a picture, I first ask myself: why am I taking this picture? I think a serious attitude towards each shot will determine the depth of your picture.

G.M. Can you tell us a bit about your future projects?

C.K.L. I have been hosting photography trips. In September, I will be taking a photography tour to China. Then in December I will be going to Myanmar again. I hope to host more of this kind of trips in the near future. Those who are interested can Facebook me.

A monk on his way back to temple - Photo by Chee Keong Lim

‘Going Home’ © Chee Keong Lim

Discover more of Chee Keong Lim’s work and photo projects on his 500px Page or Facebook.

Disclaimer: This interview has been lightly proofread and edited for style purposes.

All photographs featured on this post belong to CHEE KEONG LIM and are protected by intellectual property rights.